The importance of split testing campaigns
When it comes to email marketing, split testing (or A/B testing) is the process of sending variations of your emails to different portions of your contacts. It helps understand which email performs better, so you can send that email to the rest of your contacts. It also enables you to understand what content is the most engaging. Performing split testing for your campaigns increases your open and click-through rates as you send emails that are proven to be the most likable. Follow the steps in this tutorial if you need help spĺit testing your campaigns on ActiveCampaign. We’ll show you how to do it in two different ways: the first one to test your subject lines and the second one to test your contents.

What are the benefits of testing my email campaigns?
A/B testing your campaign will get you essential data about your audience’s behavior even before your campaign starts running. You can use this data to send more effective emails. Also, if you are unsure about a new idea for your subject lines or your emails content, you can test them first. Also, split testing can help you:

Increase your conversion rates
You get better results by keeping things measured. That’s why split testing your campaign increases your conversion rates; You will know what emails will deliver better results which traduces on higher conversion rates.

Reduce your bounce rates
Split testing allows testing subject lines. The more emails you test, the better your subject lines will become. And there are more chances your recepients will open your email when you send them a strong subject line.

Increase your users' engagement
An account in ActiveCampaign represents a business. This means that more than 1 contact can exist for an account, depending on the business department. For example, you can have a contact for the sales manager and a different one for the marketing manager. Having accounts makes the sales processes more straightforward for you if you’re a B2B provider.

Save money on expensive analysis tools
Using ActiveCampaign’s native split testing functionality will do a great job when testing your emails. It’ll save you money on tools you usually spend on when your campaigns are not delivering.
How does split testing works on ActiveCampaign?
ActiveCampaign has a native split testing tool integrated for its email campaigns. It lets you test each part of your email, from subject to content. The split testing functionality is available for all subscription plans, so you won’t have to pay more to test your emails.

Is ActiveCampaign split testing better than other testing tools?
ActiveCampaign is a reliable email service provider, which means your emails will arrive in your contacts’ inboxes. ActiveCampaign testing functionality is as good as any other A/B testing tool. Also, consider that ActiveCampaign uses efficient tracking tools to know if your contacts open your emails once they arrive.

How to use A/B testing on ActiveCampaign?
In ActiveCampaign, there are two types of split testing you can perform:
1.- Split test different subject lines and/or from information
2.-Split test different subject lines, from information, and/or email contents
In 2 different tutorials, we will explain how to test two different subject lines for the first one and two different contents for the second one.
How to split test 2 different subject lines
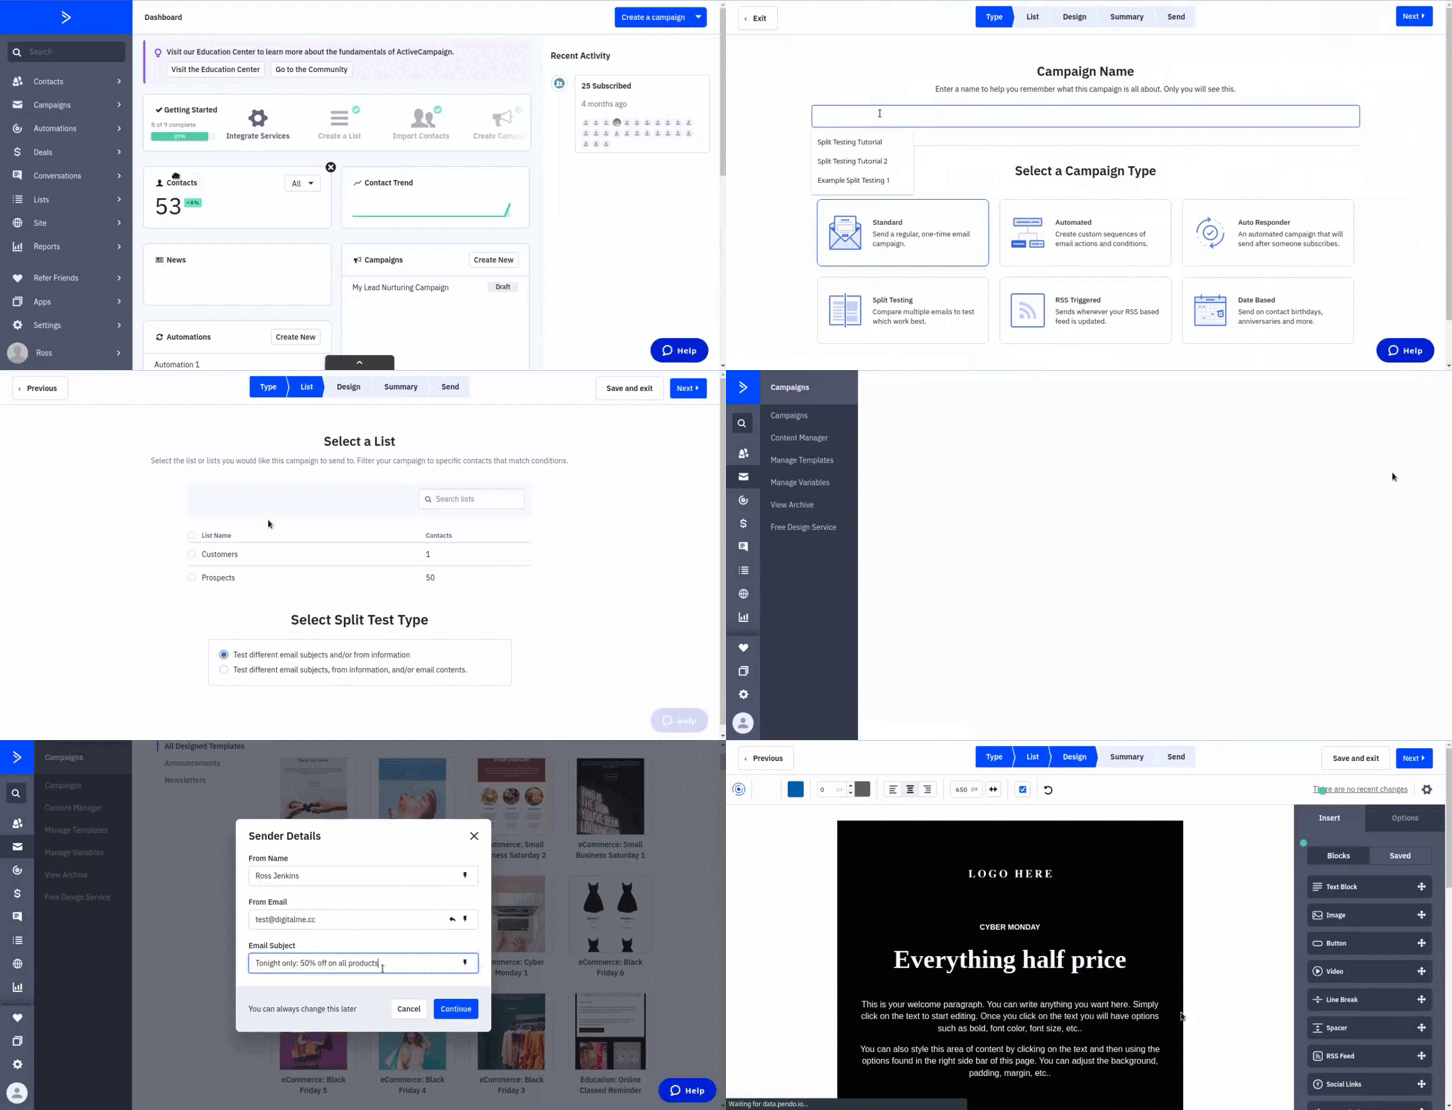
1.- Go to the main dashboard on your ActiveCampaign, and click on “Campaigns”.
2.- Click on the “Create a campaign” button at the upper right of your screen.
3.- You’ll be redirected to the campaign creator. In there, type in the name of your campaign.
4.- For “Select a campaign Type”, select “Split Testing”.
5.- Click on the “Next” button.
6.- Select the lists of contacts to which ActiveCampaign will send your emails.
7.- Select the Split Test Type. We will choose the “Test different email subjects and/or from information” for this first tutorial.
8.- Choose the template that better suits your needs. You can choose a layout if you need to create a template from scratch.
9.- Fill in the sender details. For the Email Subject, use the first subject line you’ll use for your split testing. Click “Continue” to go to the next step.
10.- The content editor will open. Edit your content according to your needs. Remember, we can only change subject lines for each email variant in this first tutorial.
Add a new variant
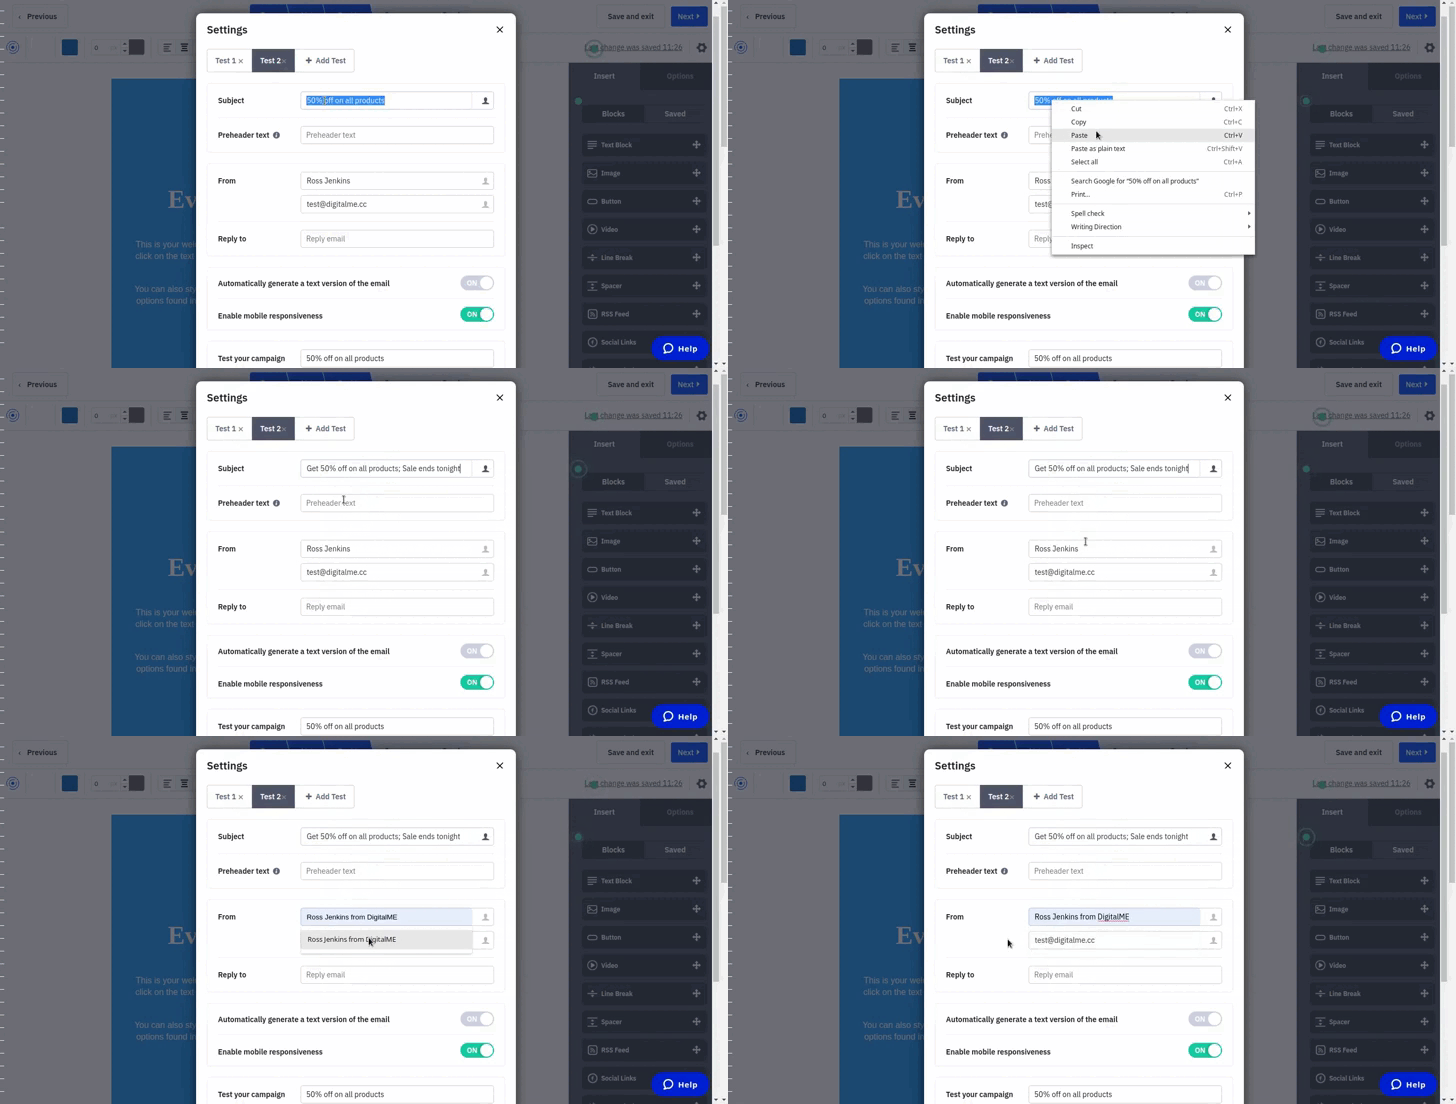
11.- Click “Next”. It’ll request you add a new variant for your subject line. Click on “Add Test” to add a new variant. We’ll only use two variants for this tutorial, but you can add up to five subject variants.
12.- Remember you can also change the preheader text and the from details for each version of your email.
13.- Close the Settings window and click on “Next” when finished.
Select the split options
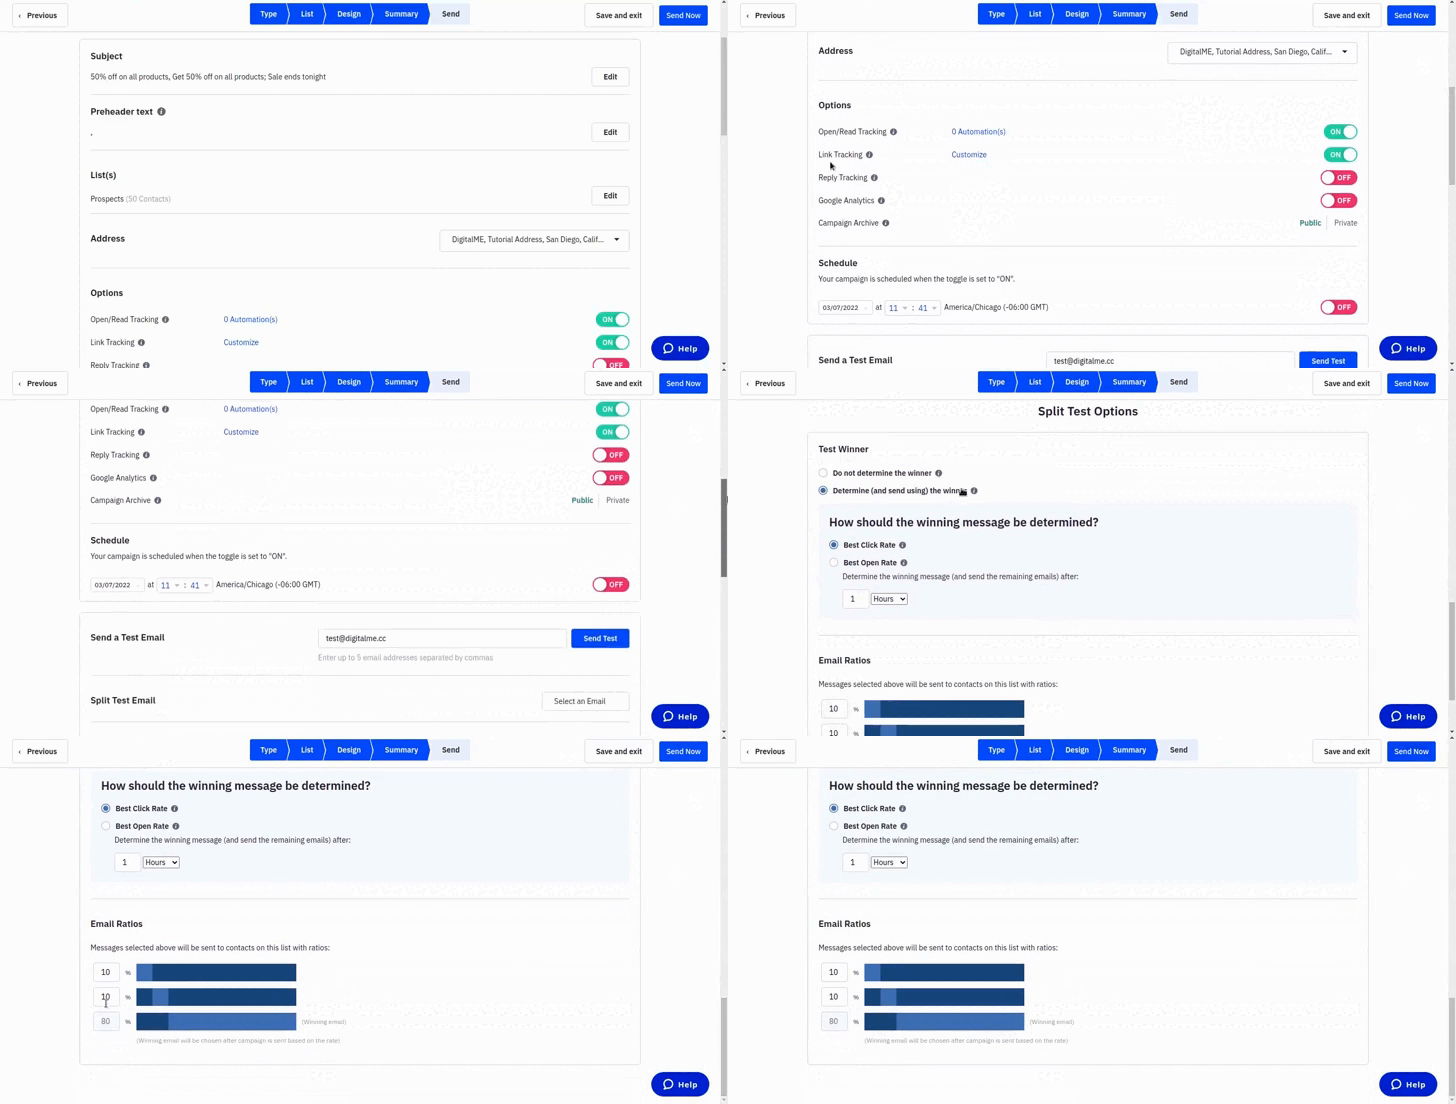
14.- Review the campaign summary. Make sure the sending details are correct.
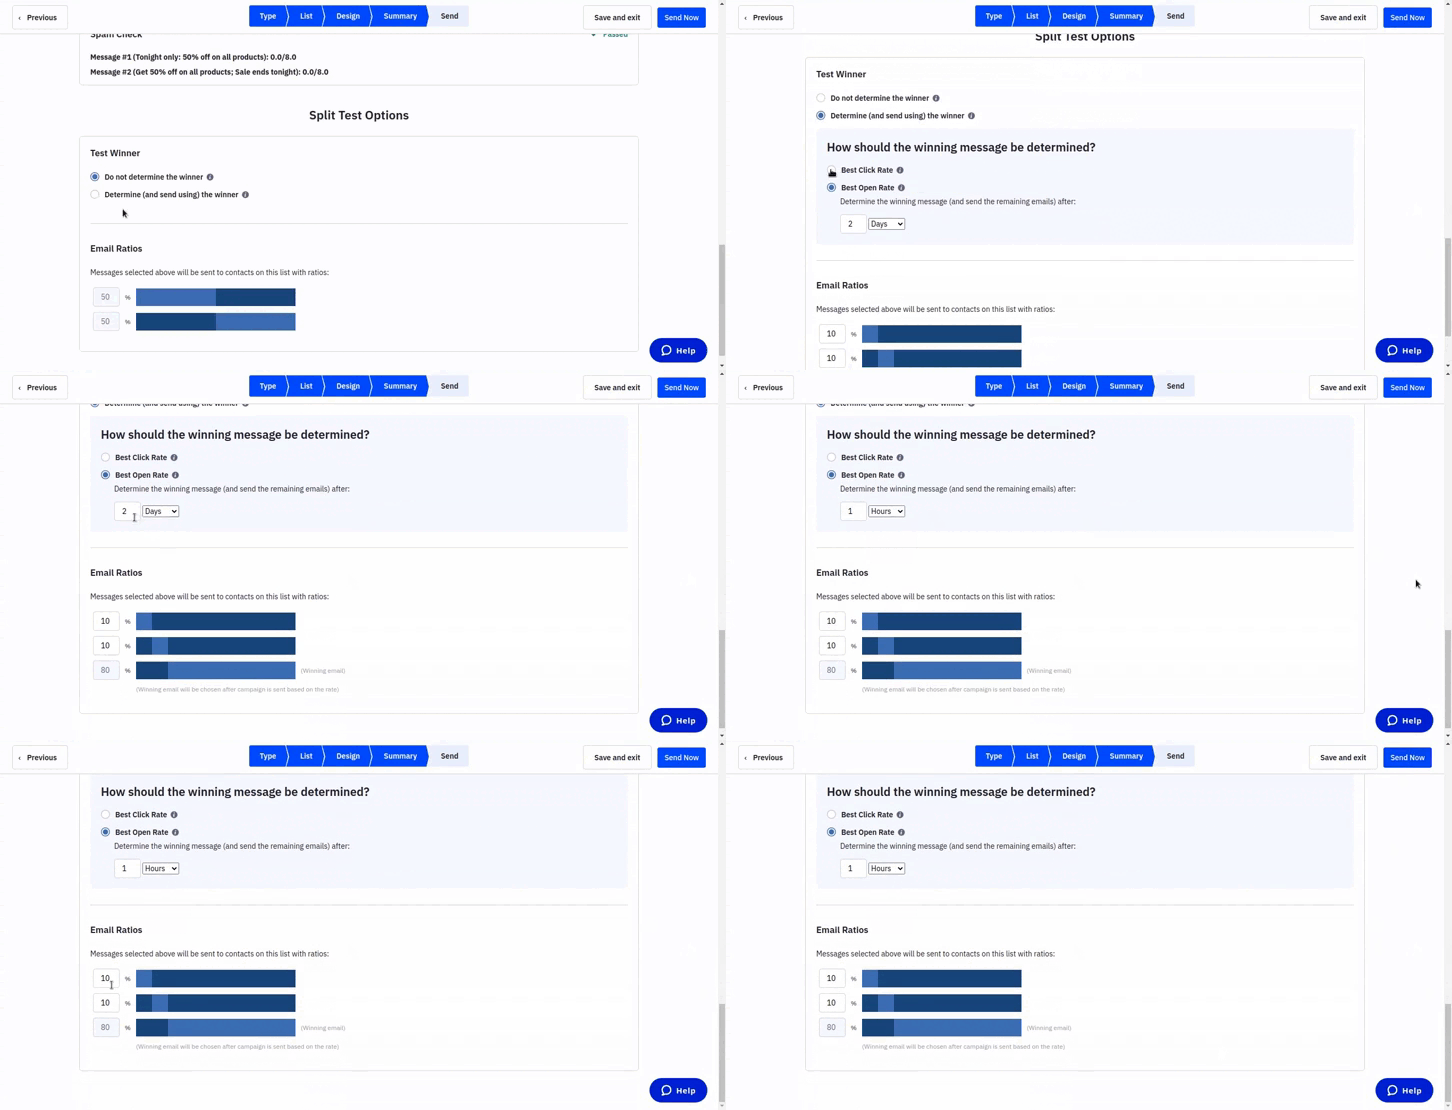
15.- Below, you’ll see the Split Test options. For the Test Winner one, you’ll have two options:
“Do not determine the winner”: If this option is selected, ActiveCampaign will send the email variants at equal proportions.
“Determine (and send using) the winner”: If this option is selected, then you’ll assign a percentage value for each email variant, and AC will give the remaining to the winner. ActiveCampaign will send each variant to the percentage of contacts you chose and decide which variant is the most successful. Then, it will send the winner email to the winner ratio.
We’ll use the second option in this tutorial.
16.- Choose the criteria that ActiveCampaign will use for choosing the winner. You can select only one of these two options:
Best Click Rate:
The winner will be the one with the most clicks on the buttons/links inside your email.
Best Open Rate:
The winner will be the email with the better open/read rate.
We’ll choose the second choice for this tutorial since we want to send the email with the most effective subject line.
17.- Choose the time for when you need to send the winner email to the remaining percentage.
18.- For the Email Ratios, we’ll assign a 10% value for each email version and an 80% for the winner. Assign what you consider to be best for your campaign.
19.- Click on “Send Now” to start sending your emails.
How to split test different subject lines and contents
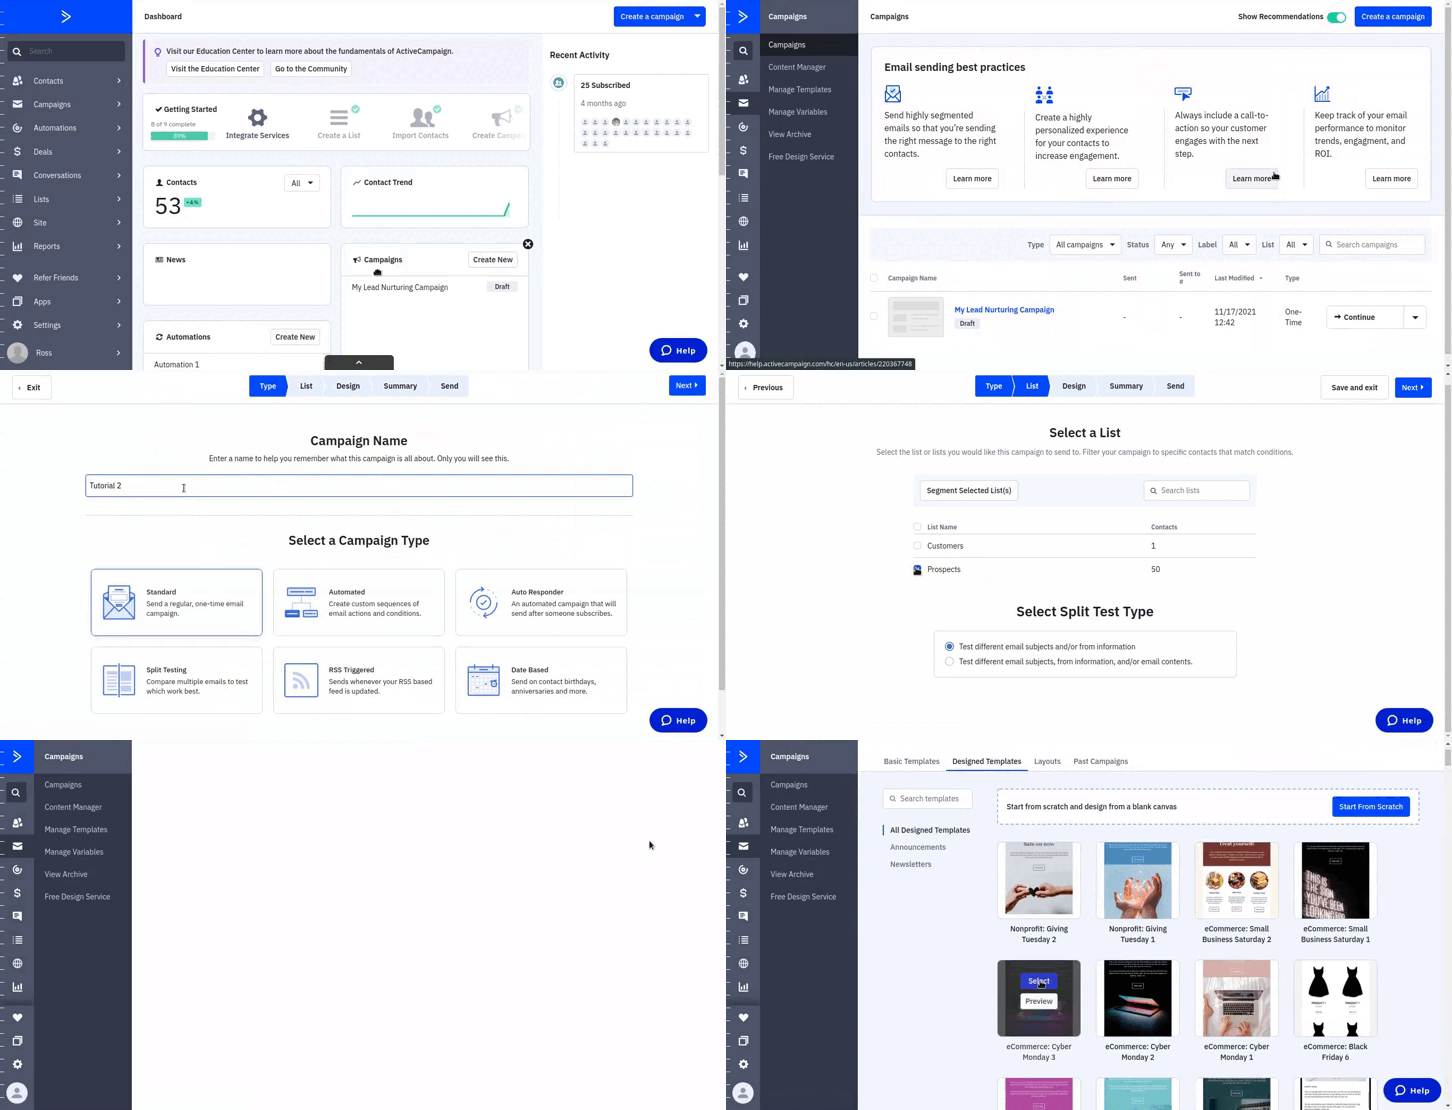
1.- Go to the main dashboard on your ActiveCampaign, and click on “Campaigns”.
2.- Click on the “Create a campaign” button at the upper right of your screen.
3.- Type in the name of your new campaign.
4.- For the “Select a campaign Type” option, choose “Split Testing”.
5.- Click on the “Next” button.
6.- Select the lists of contacts to which AC will send your emails. You can select more than one list.
7.- Select the Split Test Type. We will choose the “Test different email subjects, from information, and/or email contents” option for this second tutorial.
8.- Choose the template that better suits your needs.
9.- Fill in the sender details. For the Email Subject, use the first subject line you’ll be using for your split testing. Click “Continue” to go to the next step.
Add a new variant
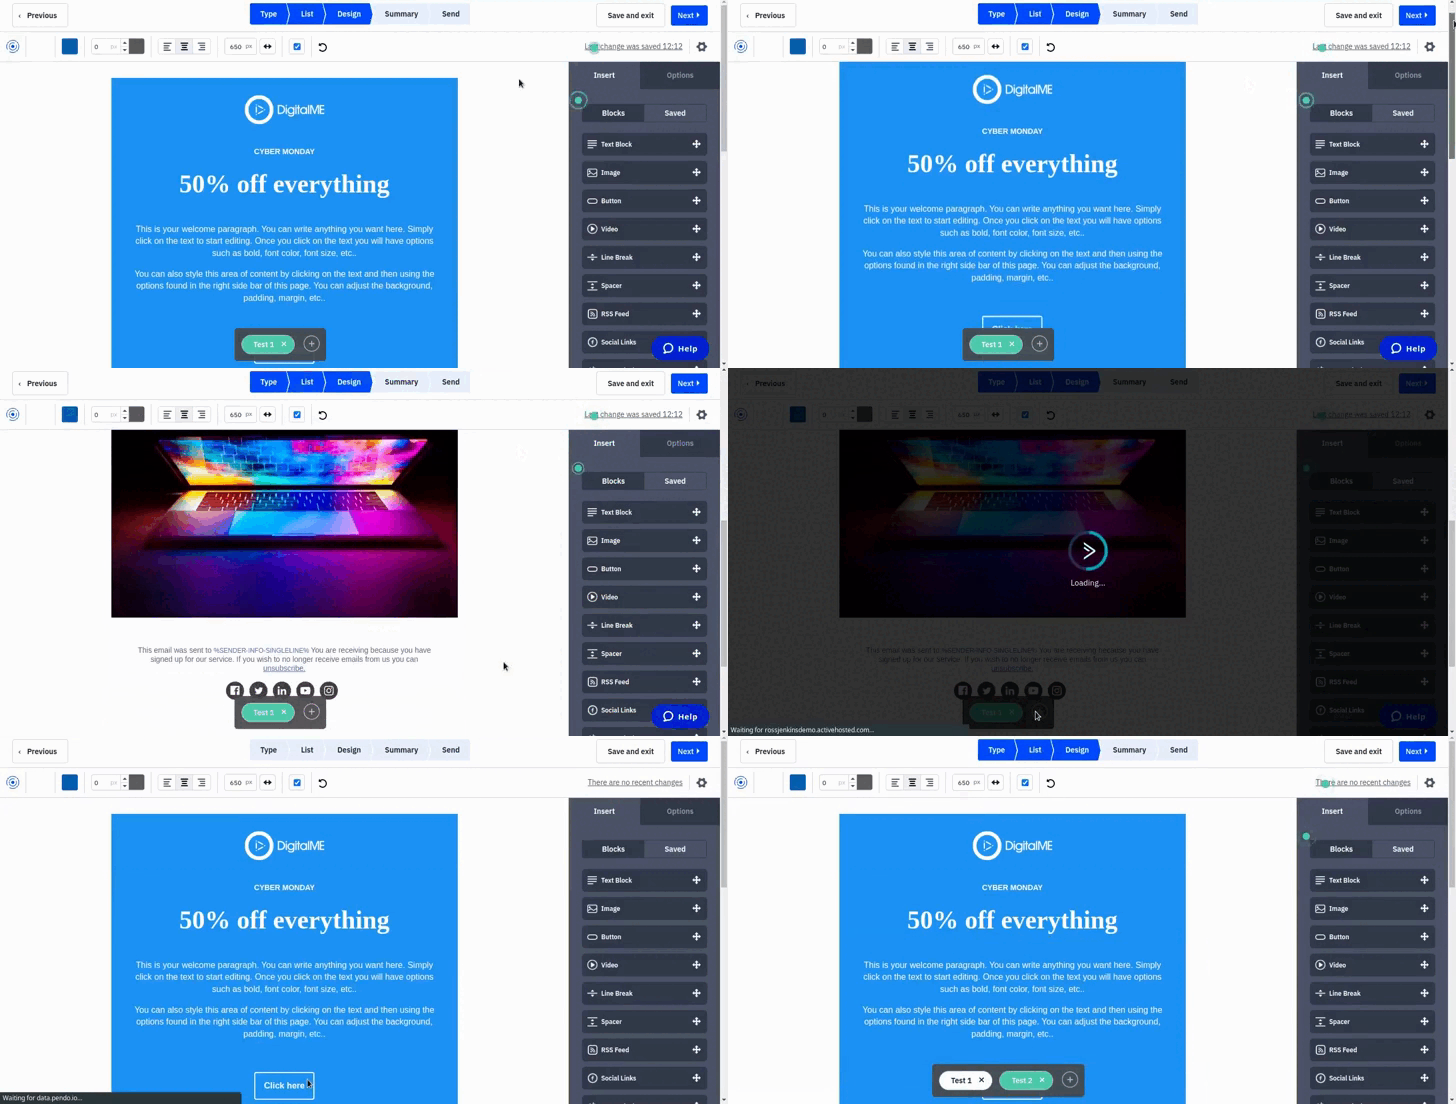
10.- On the editor, edit the content of the first email variant according to your needs.
11.- Click on the plus “(+)” button to add a new version of your email. Then change the contents according to your needs. You can create up to 5 different versions of your email.
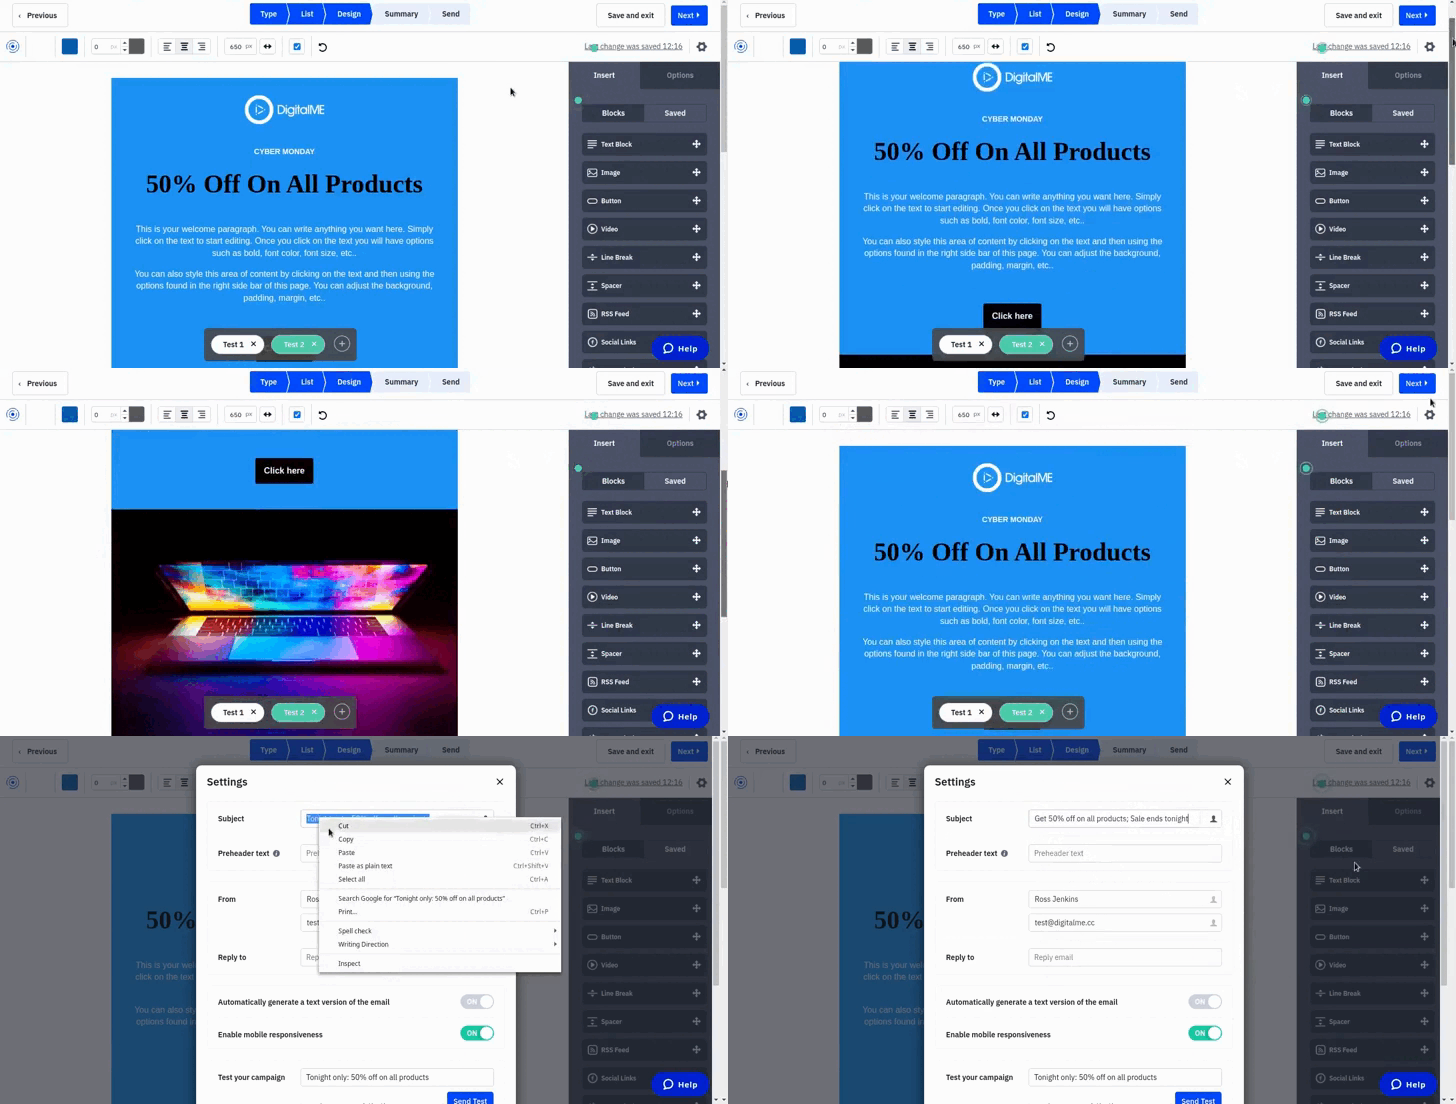
12.- Click on the gear icon if you need to change the subject line and sender details for your variants.
13.- Close the Settings window and click on “Next” when all the email variants are ready.
Select the split options
14.- Review your campaign summary. Make sure that the sender details are correct.
15.- For this tutorial, we’ll also use the second (Determine the winner) option
16.- We’ll use “Best Click Rate” as the winner criteria since we need to send the email with the most engaging content.
17.- Choose the time you need to send the winner email to the remaining percentage.
18.- For the Email Ratios, the same as before, we’ll assign 10% for each email version and 80% for the winner. Assign what suits you best.
19.- Click on “Send Now” to start sending your emails.

Need some Help?
That’s it. That’s how you can start using split testing to make your email campaigns more efficient on ActiveCampaign. Remember that you can use up to five versions of your emails for each campaign, so make sure each version contains all of the elements variants you want to test. If you try content variations, It’s highly recommended not to change many elements for each variant as you won’t know which one made the difference. As for this tutorial, we only changed the header line and the button color. Remember that at DigitalME, we can help you test your email campaign, so they deliver the best results. Click on the “Get in touch” button if you’re interested so we can reach out to you.
Contact us .
Please fill out this form and we will get back to you as soon as possible


 IN VALENCIA AND SAN DIEGO