
What is Gravity Forms?
Gravity forms is one of the best form builders for WordPress. It allows you to create visually appealing web forms with no technical knowledge. Its drag and drop builder is perfect for building complex and responsive web forms much faster without having to code them yourself. The best part about Gravity forms is its support with CRM and marketing tools like ActiveCampaign, Hubspot, Mailchimp, and Campaign Monitor. It also has integration with payment gateways for eCommerce. And although it may not be the most affordable web form builder, it’s undoubtedly one of the most powerful and better supported. Read this article if you’re using ActiveCampaign and want to learn how to connect Gravity Forms to your ActiveCampaign account.

Gravity Forms Features
Gravity forms’ features are extensive; it covers everything from essential functionalities for primary web forms to complex eCommerce data collection with conditional logic and dynamic field values. For example, suppose you need to collect information for your eCommerce depending on your stock availability, the shipping location, and your product variations. In that case, Gravity forms can be your best choice. Here are some of the most impressive features that make Gravity Forms so unique:
— Drag And Drop Builder —
— Form Importer and exporter —
— Paginated step forms —
— Different Languages —
— API and Webhooks —
— Saving unsent forms —
— Digital Signature fields —
— Discount Codes Generator —
— Payment Gateways integration —
— Conditional pricing eCommerce —
— Automate process after submission —
— Google reCAPTCHA —
— Show preview to users before they submit —
— PCI compliant —

Is Gravity Forms compatible with ActiveCampaign?
Yes. Gravity Forms’ most basic plan includes an add-on for ActiveCampaign so you can synchronize your form submissions with your ActiveCampaign account. That’s perfect if you’re trying to have complex forms on your website and find ActiveCampaign’s native web form builder limited. With Gravity Forms, you’ll create all of your forms on your WordPress website and use ActiveCampaign to collect the data and create automations based on them.

Is Gravity Forms any better than ActiveCampaigns’ form builder?
ActiveCampaign’s drag and drop web form builder is good for building primary and middle-level web forms. However, if you’re trying to create web forms that need conditional logic and multiple steps (in the same URL), you’ll find ActiveCampaign short of features. That’s when using a dedicated web form builder plugin like Gravity Forms can be a good idea. However, that doesn’t mean ActiveCampaign’s builder is terrible; it’s just that it wasn’t meant to use it for creating advanced web forms. That being said, consider using Gravity forms just when you see ActiveCampaign’s builder isn’t enough for creating your web forms.

Gravity forms Pricing 2022
As of 2022, Gravity Forms offers three different tiers for its plugin. They all have support for ActiveCampaign, but they have extra add-ons you can use. The basic plan is restricted to a single website for $59 a year. The Pro plan includes unlimited websites and more add-ons for $159 a year, and the elite plan consists of all of the add-ons and integrations, but you can only use it on three sites for $259 a year.

How to use Gravity forms with ActiveCampaign
To integrate gravity forms with your ActiveCamapaign account, you must have an ActiveCampaign subscription, the Gravity Forms Basic Plan, and the plugin installed on your WordPress website. Once you have completed these previous steps, follow the next ones to connect ActiveCampaign and set up Gravity Forms submissions:
Install ActiveCampaign add-on
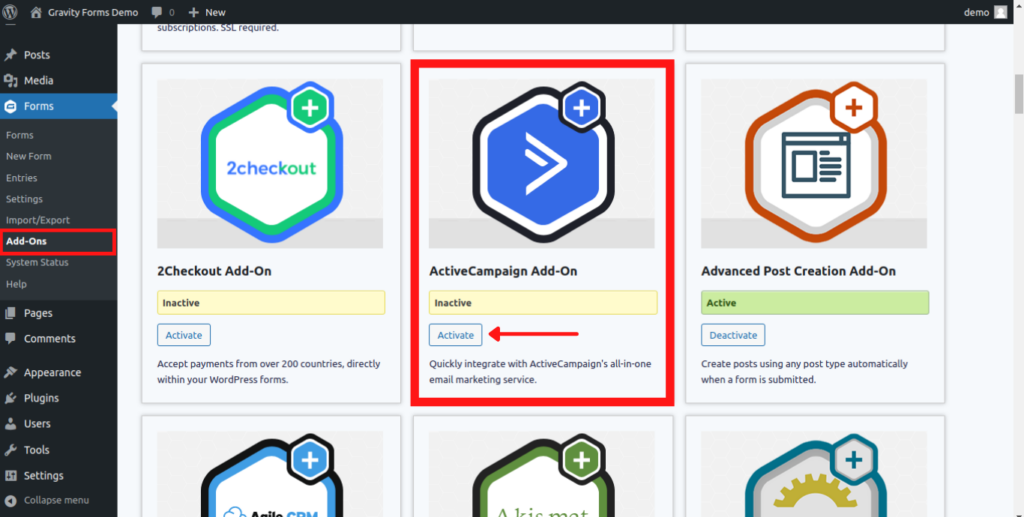
1.- Go to your WordPress Dashboard and look for the “Forms” tab. You’ll see the “Add-Ons” submenu. Click on it to see the available add-ons for your account.
2.- Look for the “ActiveCampaign” add-on and click “Activate”. The add-on will then activate, and you’ll see it on the list.
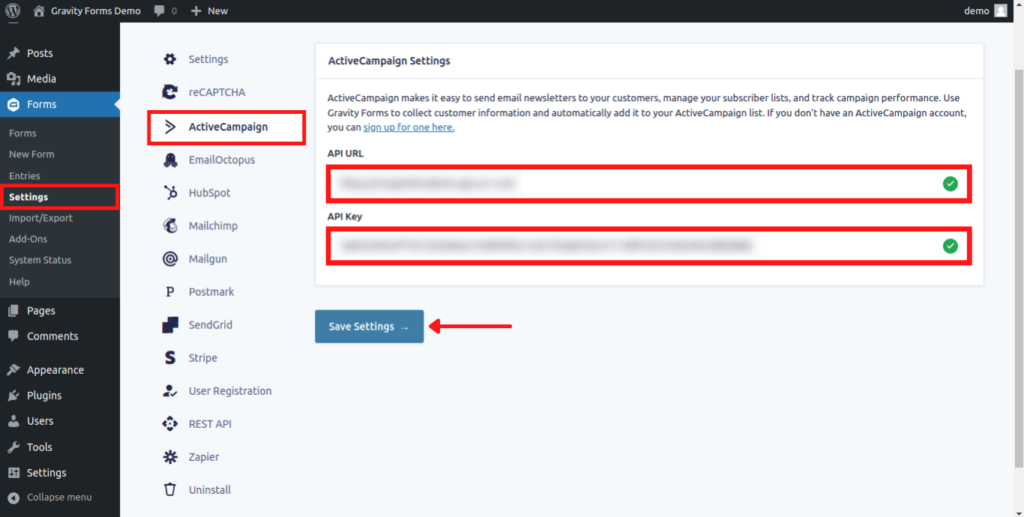
3.- Next, click on the “Settings” tab inside the “Forms” menu.
4.- Now, you’ll see the ActiveCampaign tab in the Gravity Forms settings menu. Click on it to connect to your ActiveCampaign account.
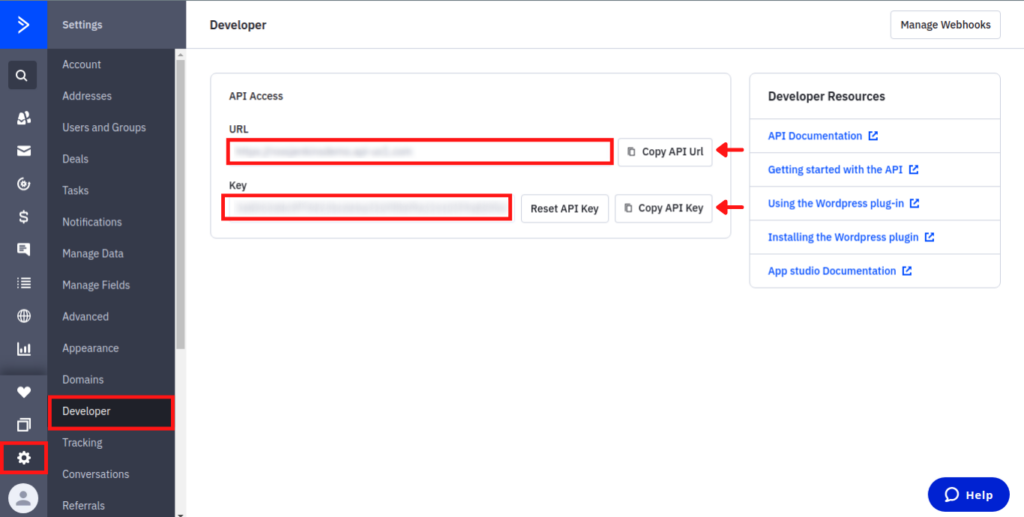
5.- You’ll need to have your ActiveCampaign’s API URL and API Key to connect to your ActiveCampaign account. Go to your ActiveCampaign dashboard and click on the Gear icon to access the settings. Next, click on “Developer” to see your URL and API keys.
6.- Copy your URL and API keys and paste them into the Gravity forms fields. Click “Save Settings”. Gravity Forms will connect to your ActiveCampaign account.
ADD A NEW ACTIVECAMPAIGN FEED
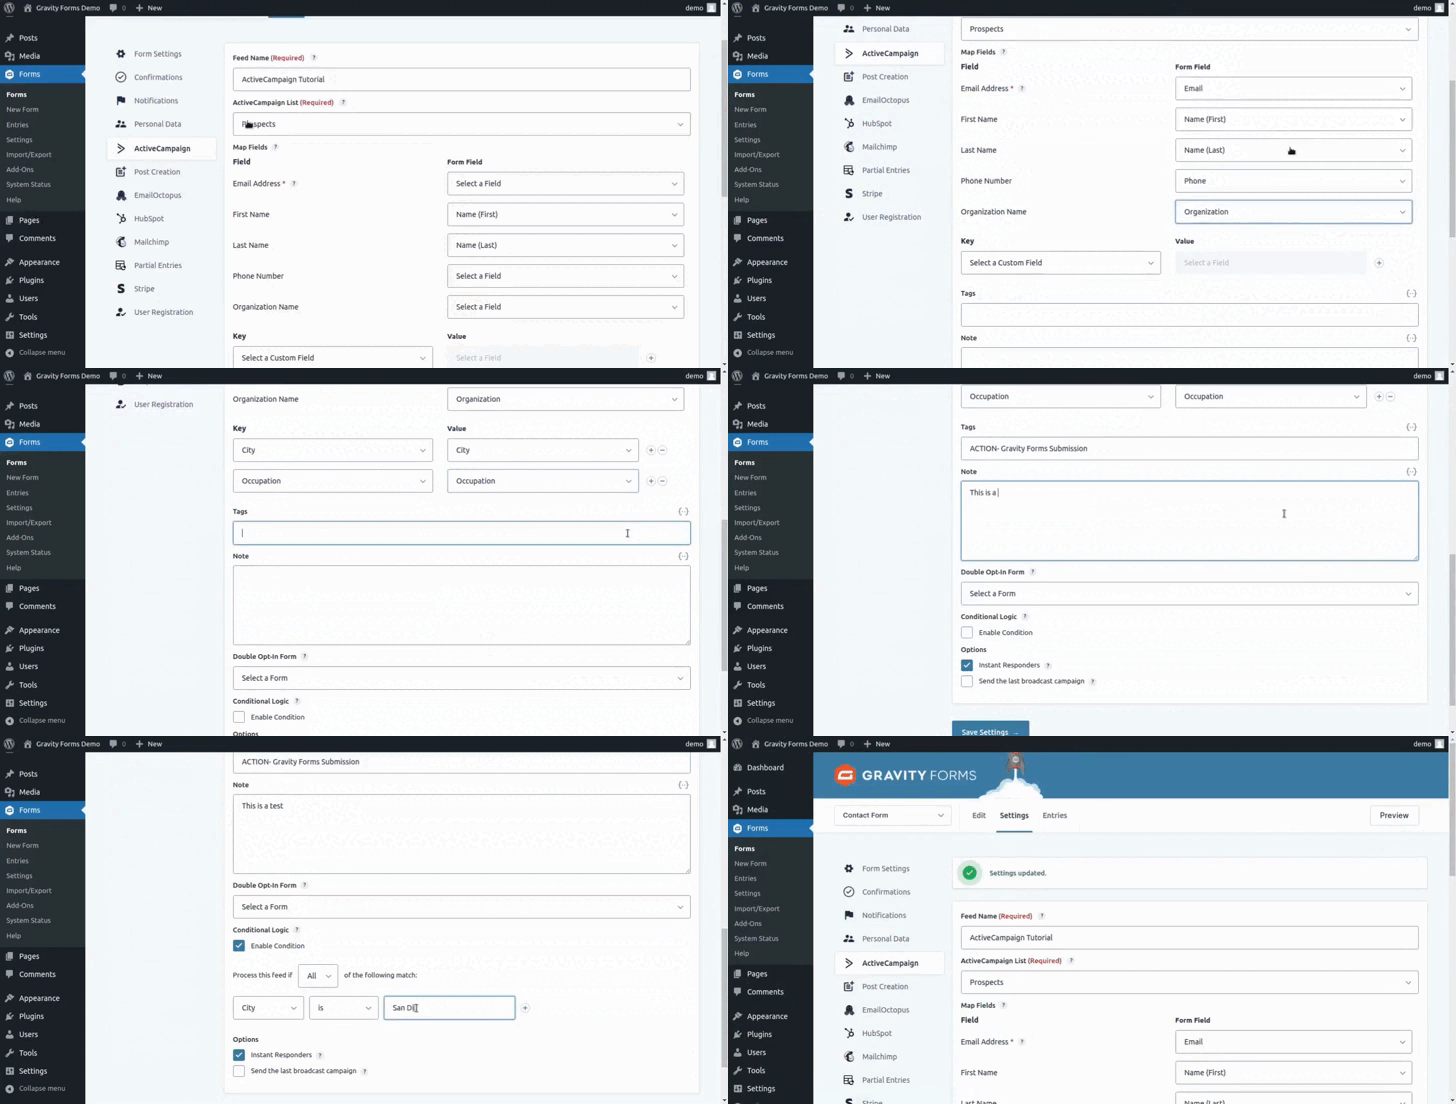
After Gravity Forms connect to your ActiveCampaign account, you’ll still need an extra step to retrieve the data from the form submissions. You’ll need to create a feed so the data submitted will synchronize with your ActiveCampaign’s database in real-time. Follow these steps to create the feed:
1.- Click on “Forms” to see your list of forms. If you don’t have any, you can create a new one by clicking on “Add New”.
2.- After you spot the form you want to synchronize with ActiveCampaign, hover over it and click on “Settings”.
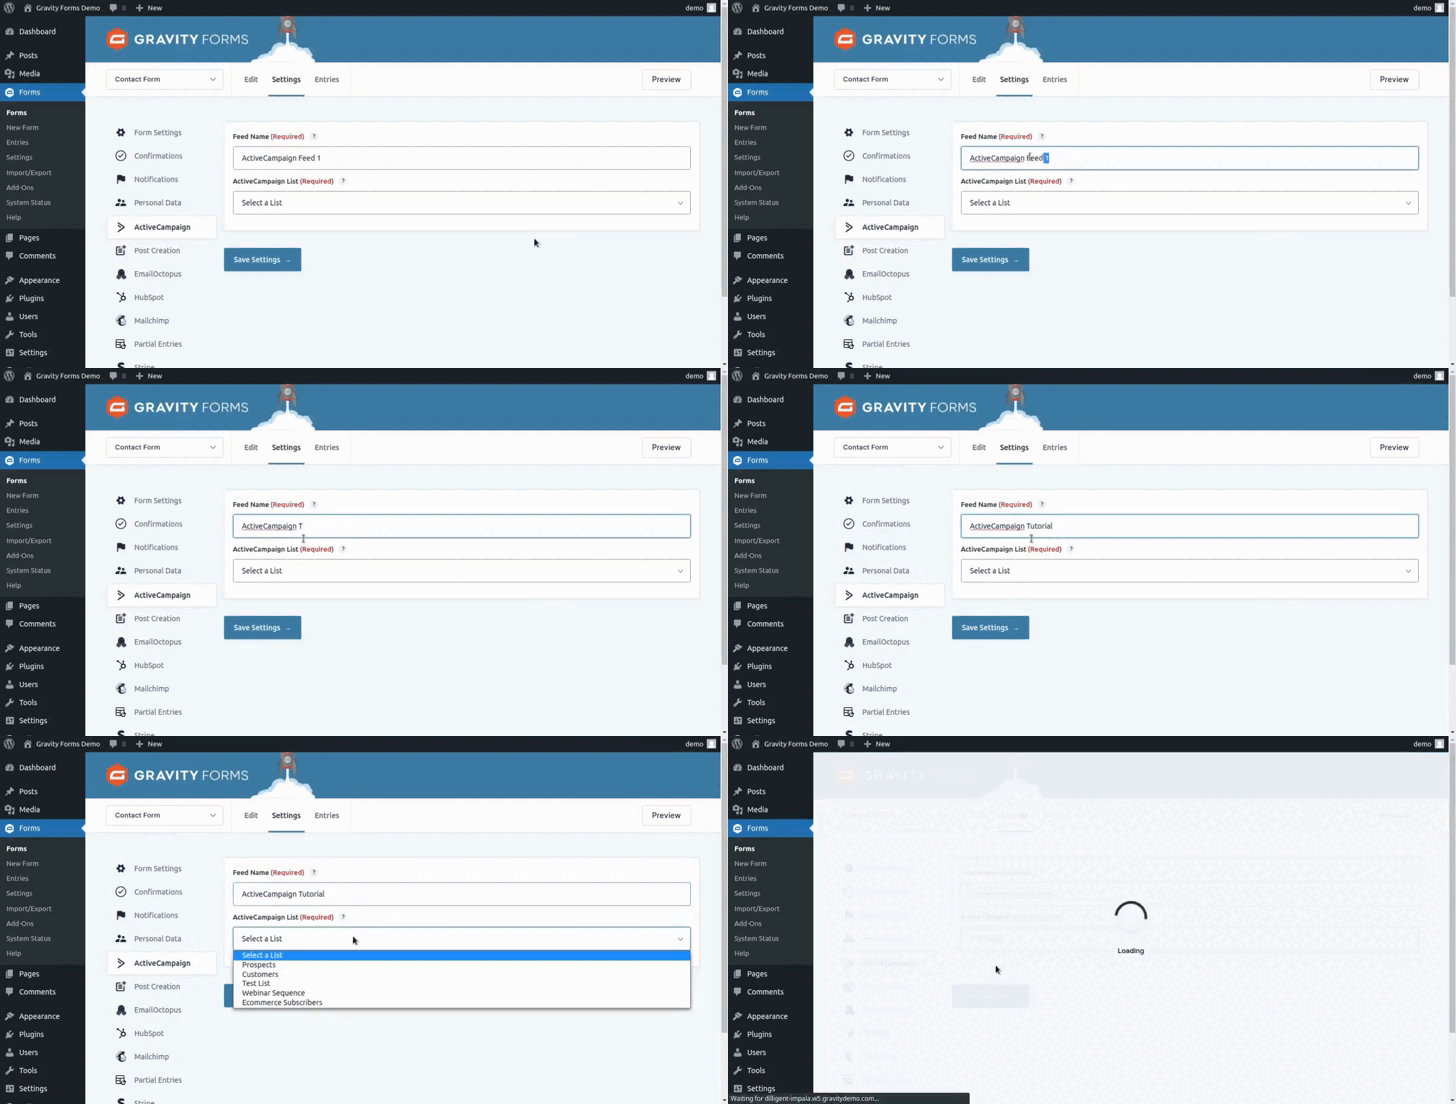
3.- Click on the “ActiveCampaign” tab. It will ask you to create a new feed to connect your form. Click “Add New” to create a new one.
4.- Type in the name of your feed. It’ll be for your record only, and it won’t show on your web form.
5.- Select the list for which the form will save the submitted data.
Mapping and settings
6.- You’ll need to map the fields in your form to match your ActiveCampaign’s ones. Select the fields in your form that match the predefined ones in your ActiveCampaign account.
7.- You can also match custom fields from ACtiveCampaign, choose them, and select their match on your web form.
8.- You can add tags to segment and trigger contacts who submitted the form.
9.- Add a note to the submission if needed.
10.- Enable a double op-in to trigger a form that sends a double opt-in email to confirm users’ subscriptions.
11.- You can enable a conditional logic so the form will only submit data to your AC account when the form meets the conditions.
12.- You can enable instant responders if you have the option enabled in ActiveCampaign.
13.- The “Send the last broadcast campaign” will send the last campaign you send to users in the same list to new contacts that submit the form.
14.- Click “Save Settings” to add your new feed.
15.- That’s it. Now your Gravity Form will connect to your ActiveCampaign’s lists. You can repeat the process to map each form and set up each submission.

Need some Help?
That’s how you connect Gravity Forms with ActiveCampaign. Now you can start building any complex form in your WordPress and submit the data to your ActiveCampaign lists. You can also create automations that apply only to Gravity Form submissions by tagging them. As you can see, ActiveCampaign is super flexible when it comes to third-party integrations; you cannot only retrieve data from them but also trigger custom automations after it. Remember that at DigitalME, we can help you connect Gravity Forms or any other plugin to your ActiveCampaign account. We can also offer you consultancy or advice on any matter related to your marketing campaigns and automations. If you’re interested, feel free to click on the “Get In Touch” button, complete the form, and we’ll reach out to you as soon as possible.


 IN VALENCIA AND SAN DIEGO