The importance of countdown timers
Using countdown timers on your emails campaigns is one of the most efficient tactics to close sales. They create a sense of urgency and scarcity for the potential buyers. According to numbers, using countdown timers can increase the sales rate by around 30% for the products you add them to. When well used, countdown timers can be a great ally to close deals for limited-time offers and products. They also help your business create more engagement since your contacts will be more attentive to your communications hoping to see the next deals.
The principle behind countdown timers resides in conveying people a sense of urgency to buy something from you and a sense of fear if they don’t do it. It tries to make them think that if they don’t buy it now, later they’ll regret it, either because it will be out of stock or the price will increase.

How to use Countdown timers
A well-executed countdown timer is what will define the effectiveness of your limited-time deals. This depends on how you are trying to implement it and where you are placing it. The information for your countdown timer must be clear and real. You won’t try to offer something that isn’t true and when users get to your payment screen they’ll be angry at you. Also, the countdown timer should display the real duration of your deals. There are many businesses that use a countdown forever; the countdown finishes and starts over immediately. This decreases the user’s trust in the business and the timer is not quite effective.

Where to use countdown timers
You can use countdown timers almost anywhere you have special price products and deals. Whether is on your homepage, a landing page, your shop page, or through more personal communication channels like messenger and email. You need to place it along with other pieces of information about your products. This will make the user understands what they are going to miss if they don’t take it. Make sure the countdown remains visible and is near the CTA button.

How to use the countdown timer on Maropost
If you are thinking about using a timer for your email campaigns with Maropost, that’s super easy and straightforward. If you still don’t have a Maropost account or if you want to try Maropost’s capabilities, you can sign up here and acquire a paid plan or book a demo so you can try it out.
Step 1
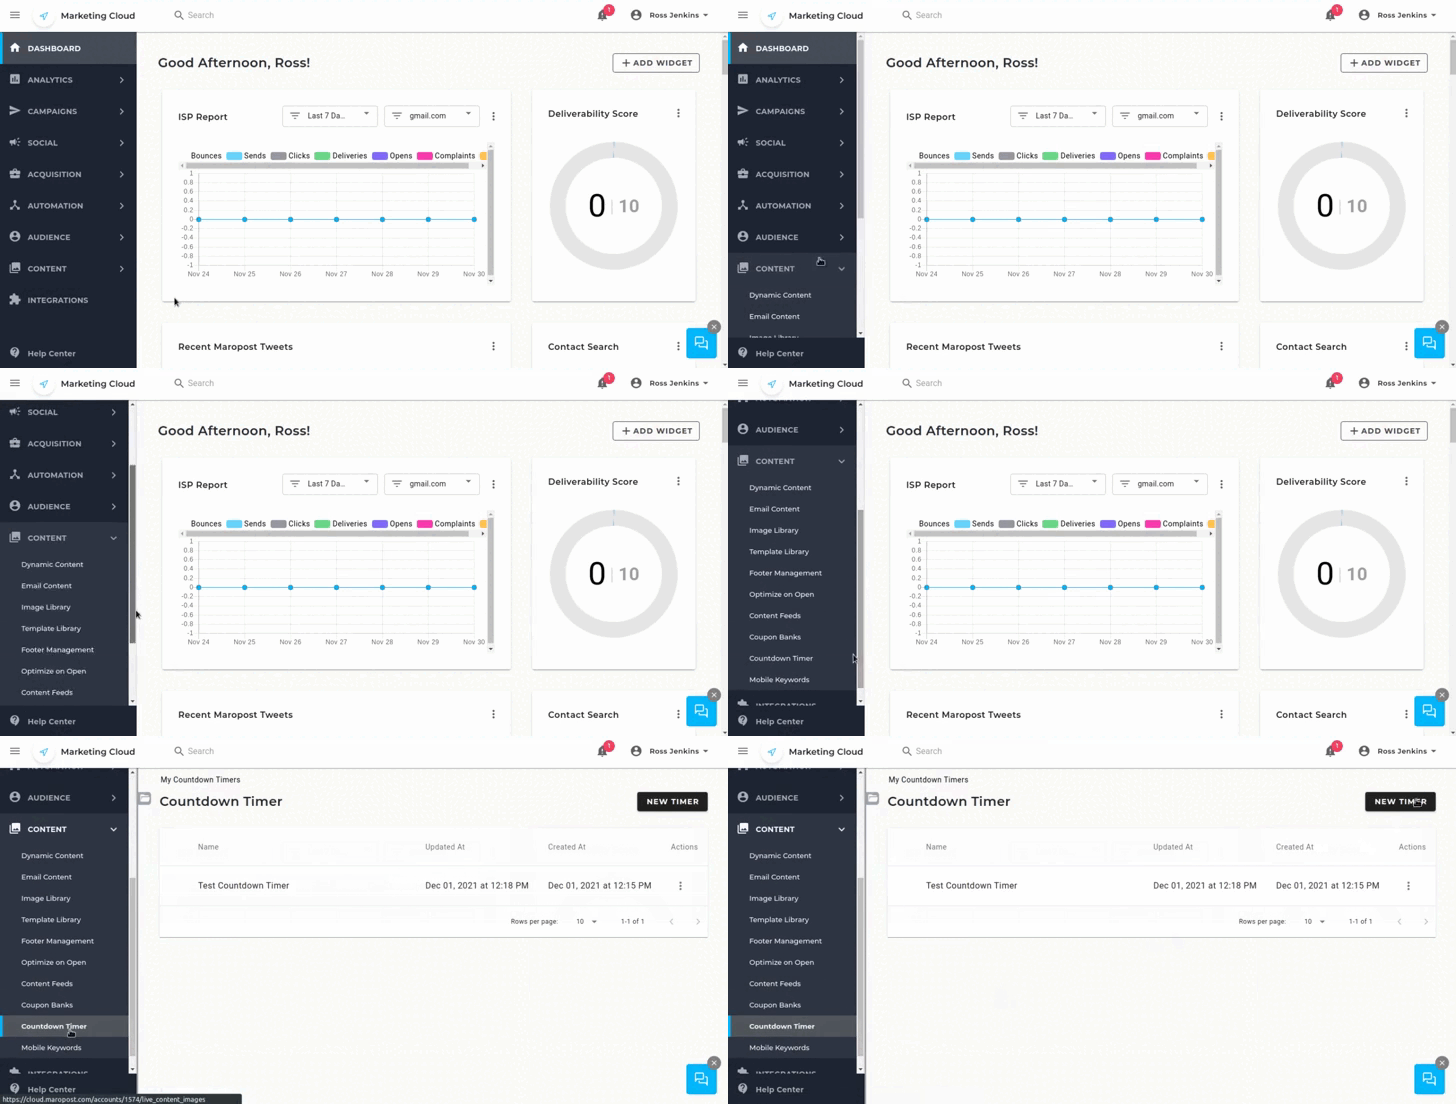
1.- Go to your main dashboard and click on the “Countdown Timer” link inside the “CONTENT” tab.
2.- Click on the “NEW TIMER” button at the upper right of your screen. It will open the countdown timer builder.

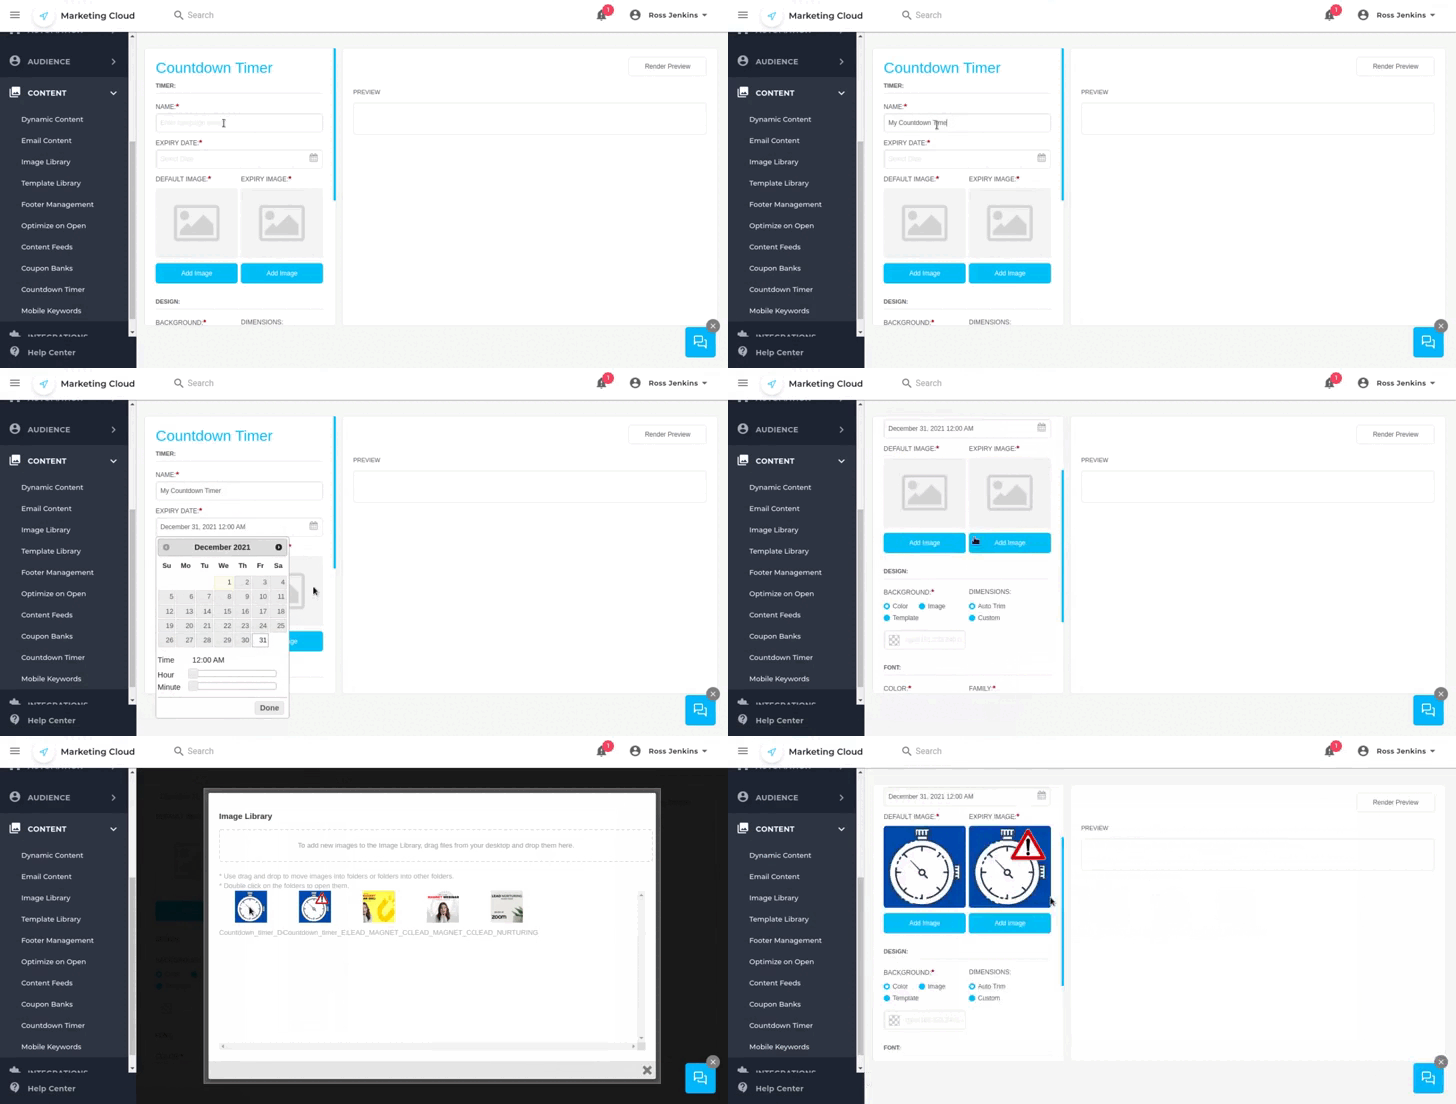
3.- Type in a name for your timer so you’ll be able to recognize it.
4.- Set an expiry date, so your countdown will start counting the time remaining for that date.
5.- Select the default image. This will appear instead of the countdown timer in case the user’s email client doesn’t allow gifs.
6.- Set an expiry image as well. It will show when gifs won’t show and the countdown timer has expired.

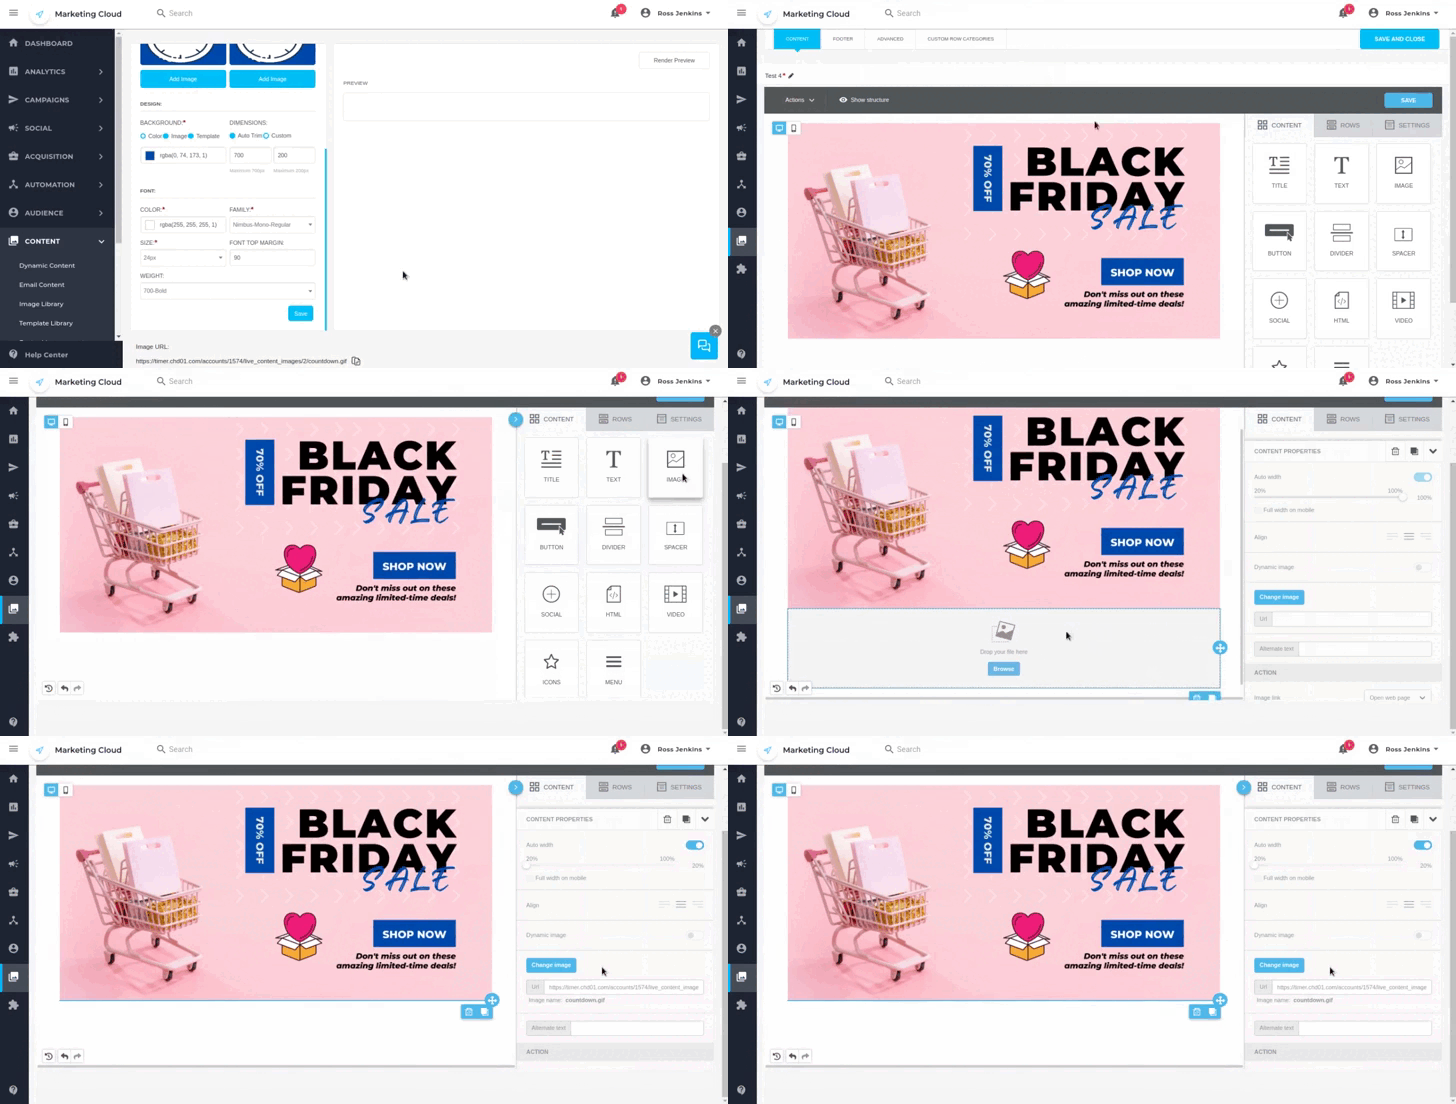
7.- Choose a background for your dropdown widget. Make sure it matches the design of the email’s content where you want to insert it.
8.- Set the dimensions for your widget. If you are going to place it around images, make sure the dimension fits the size of those images.
9.- Choose a Font style as well. Make sure it also fits the rest of your email content. You can add a top margin and adjust
10.- You can click on the “Render Preview” button at the top of your screen so it will show how the timer will look like.
11.- When you’re happy with the result, click “Save”.

Step 2
Insert your countdown timer
You can insert your timer widget anywhere on your content. To insert it you’ll need the link for the countdown you just created.
1.- Open the Countdown timer you just created, so it will show you the builder again. Click on the “click to copy” button next to the URL at the bottom of the page.
2.- Open the content builder for the email you want to insert the timer.
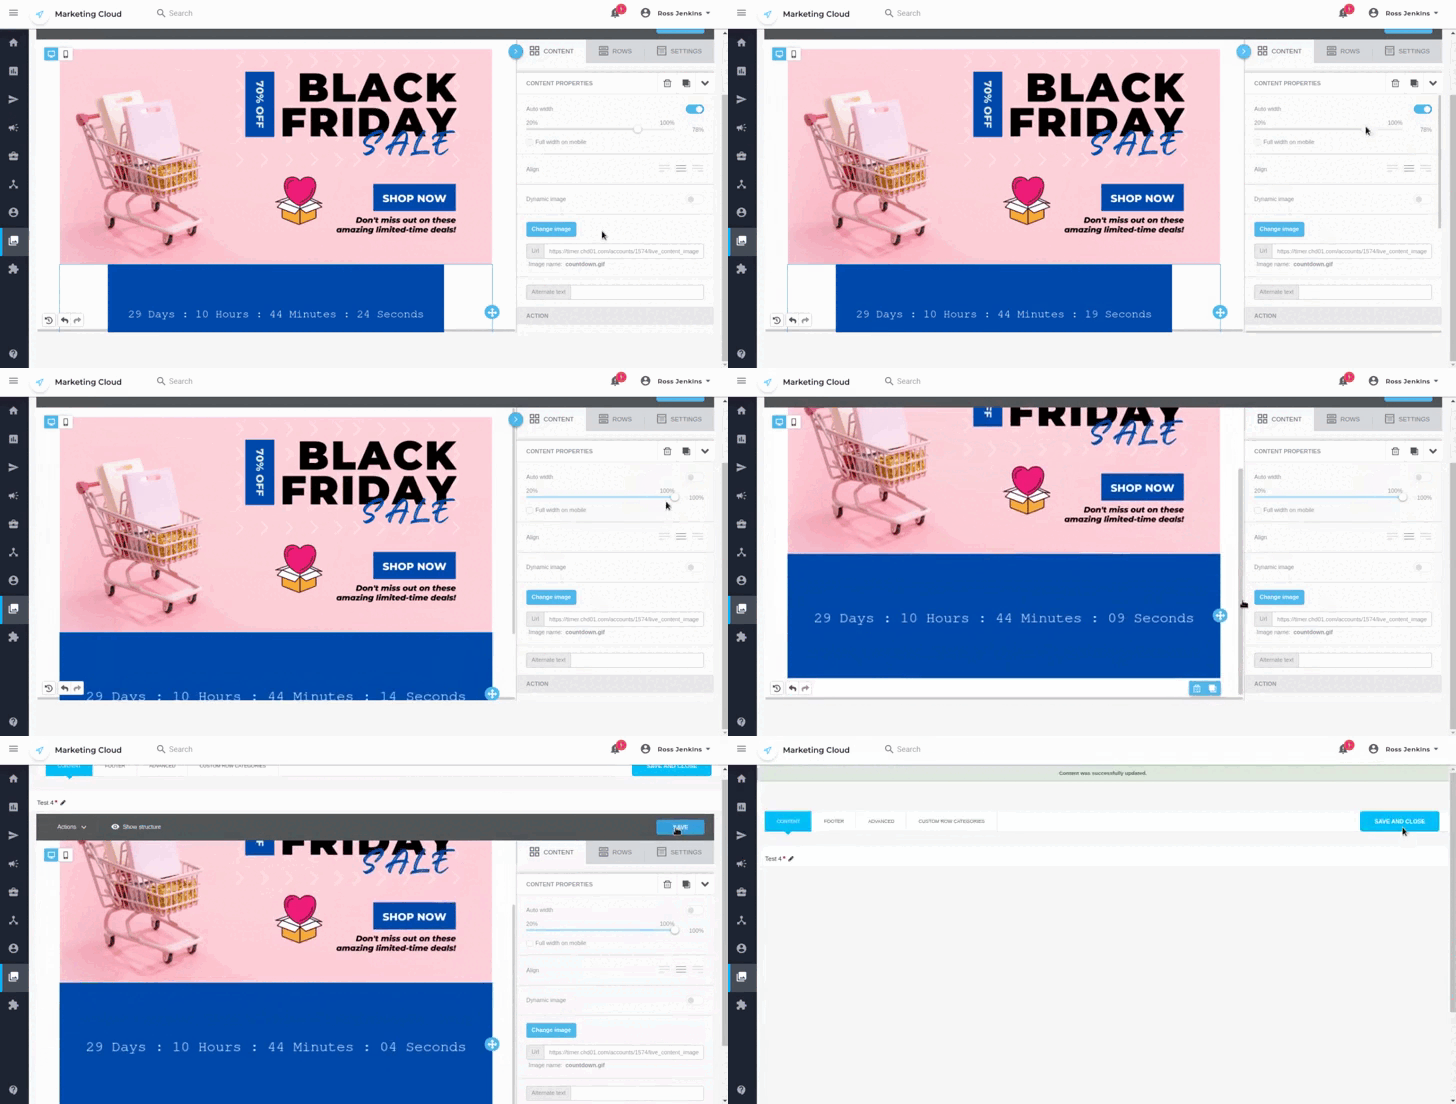
3.- If you are using the drag and drop editor, drag and drop the image in the space in which you need it placed. Click on the image block once in its place.
4.- Next look for the URL field in the editor. Paste the URL you just copied. Your countdown timer should load in a couple of seconds.

5.- You can manipulate some of the image properties, to make sure your widget size is correct and well-positioned.
6.- You can then finish adding content to your email. When all is good to go, you can finish setting up your email and schedule the sending of your campaign.

We hope you found this tutorial helpful to start using countdown timers. This will allow you to boost your sales during special dates and when you publish limited-time deals. Remember that it’s not a great idea to have permanent countdown timers, as it will make your contacts lose the hype. We can also help you with your countdown timers and your email content overall. We can also give you some advice and help you on each stage of your digital marketing strategy through our managed services. If you’re interested don’t hesitate to give us a call, and we’ll reach to you as soon as possible.


 IN VALENCIA AND SAN DIEGO