Uploading contacts on ActiveCampaign
ActiveCampaign is one of the most versatile tools for managing your marketing campaigns. You can perform multiple operations, from creating simple first touch emails to automating all of the workflows in your business. You can even manage your CRM directly from its dashboard. Its native contact management system lets you add new contacts to your lists, tag them according to their behavior, and even measure their sales readiness. Keep reading this article if you want to learn the best way to upload your contacts on ActiveCampaign.

Is it hard to upload my contacts?
Not at all. ActiveCampaign makes it super easy to upload your contacts. You can do it in multiple ways: You can import them from other sources through its API integration, upload them in bulk through a CSV file, use an external database, or even add them manually one by one. ActiveCampaign also lets your potential customers subscribe by sending an email to a special address or sending a text message to a phone number. Follow the next tutorial to be able to upload your contacts more efficiently.

Before getting started
To get started uploading your contacts, first, you need to understand some words ActiveCamapaign uses. Understanding these words will make the process easier for you:

Lists
A list is the first layer of segmentation of your contacts. On ActiveCampaign, you create lists according to the characteristics or behaviors your contacts have in common. The more lists you create, the hardest it’s for you to optimize your campaigns. That’s why it’s highly recommended to create lists based on the more general characteristics of your contacts.

Tags
WIth tags, you can segment your contacts with more detail. On ActiveCampaign, tags help you trigger automations and keep your contacts more organized. You can add more than 1 tag for them. You can add tags according to your business needs and they can be temporary. For example, you can add tags based on contacts’ interests or an action they performed on your website.

Account
An account in ActiveCampaign represents a business. This means that more than 1 contact can exist for an account, depending on the business department. For example, you can have a contact for the sales manager and a different one for the marketing manager. Having accounts makes the sales processes more straightforward for you if you’re a B2B provider.

Account owner
An account owner is a person responsible for managing an account. If your business has sales representatives you can assign each one of them a different account. When you assign an owner for an account, that owner will be responsible for closing that sale.

Custom Fields
Custom fields on ActiveCampaign let you store custom data for your contacts. They’re different than tags in the form they let you add relevant permanent information about your contacts. You can add a custom field when it doesn’t exist by default. You can create different types of custom fields depending on the data you need to store. For example, you can create a date custom field when you need to store dates.

Deals
ActiveCampaign lets you give special treatment to the contacts that are better qualified. You assign them a “deal” so they enter a pipeline. You must have created a pipeline first, to be able to add a deal for the contact.

The importance of cleaning your lists
It’s always a good practice to clean your contact lists before uploading your contacts. Sending emails to old or deprecated lists can damage your email deliverability and also will make your open rates deceitful. Consider using a tool like Zerobounce to check on your contact lists.

How to upload your contacts
Configuring and sending your SMS messages through Maropost is very easy. Follow this steps and you can start launching amazing campaigns:
How to add your contact manually
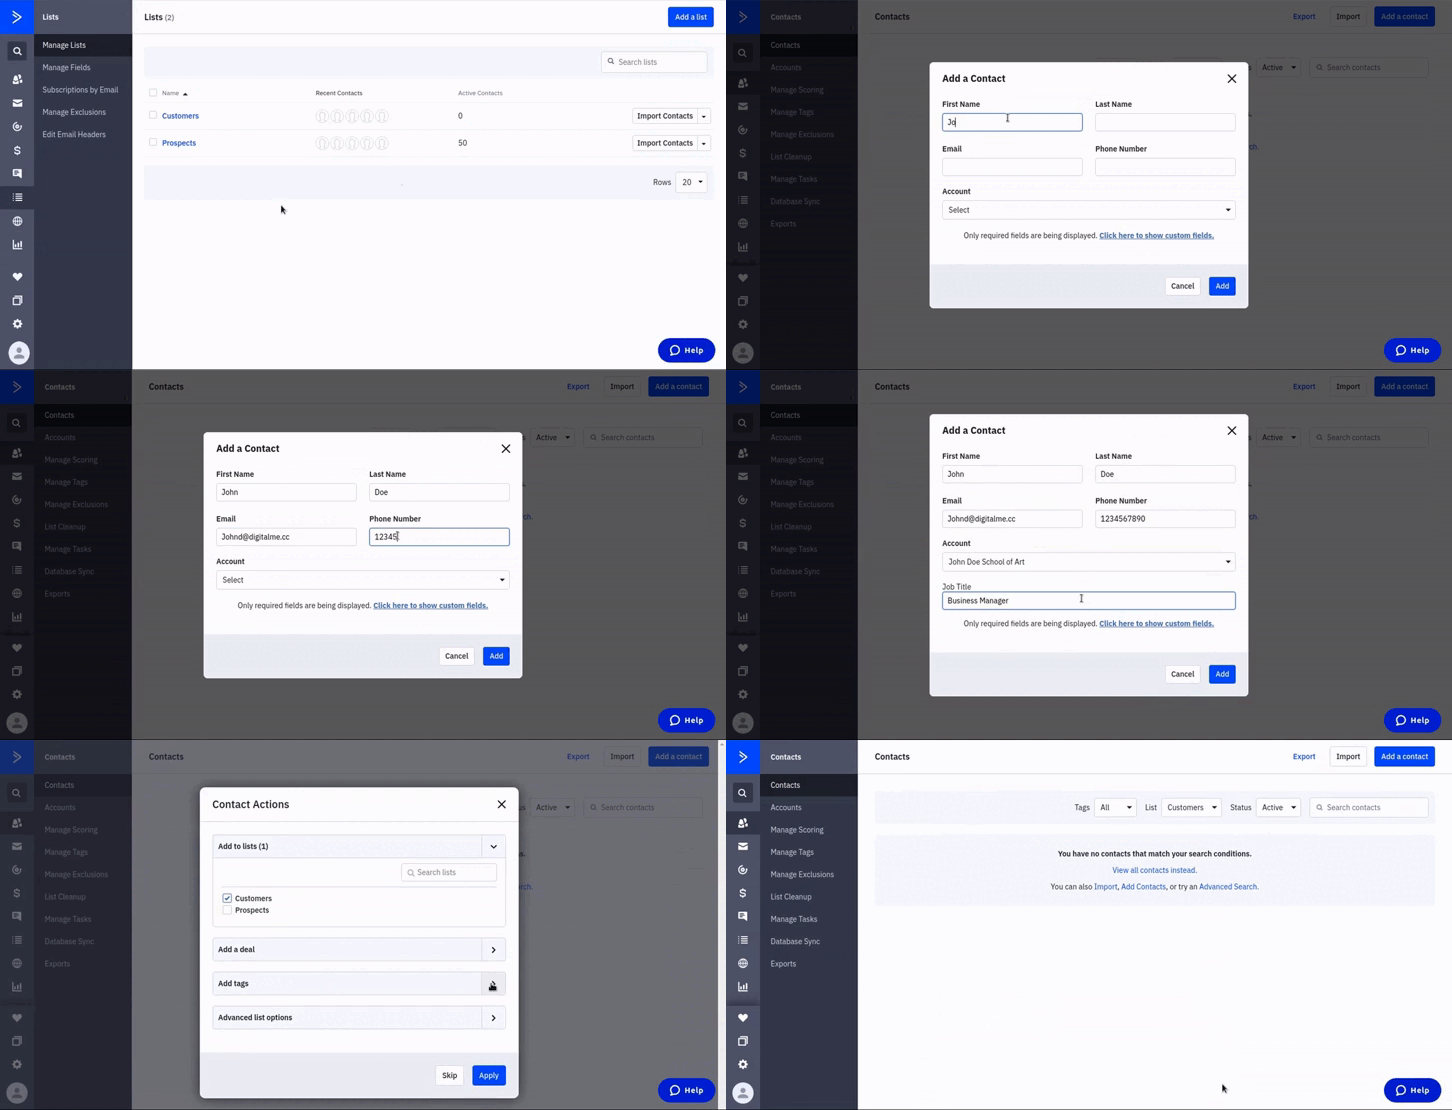
Adding a contact manually is the easiest way for adding a new contact. The downside of this method is that you can only add your contacts one by one. To add a new contact manually follow the next steps:
1.- On your ActiveCampaign main dashboard click on the “Contacts” tab.
2.- Click on the “Add a contact” button at the upper right of your screen.
3.- A new window will pop up. Fill in the requested fields. Choose an account if you need to add your contact to an existing account. You can also make the custom fields appear by clicking on the option.
4.- Click Add. Then you can perform actions like adding your new contact to a list or assigning them tags or deals.
5.- Click “Apply” when you finish. Your contact will be added.
6.- You can edit your contact anytime by clicking on it.

This is the simplest method for uploading a new contact. However, it’s not the most efficient one unless you need to upload a single contact. The most proper way to upload your contacts on ActiveCampaign is by importing them from a CSV file.
And as you read before, cleaning your contact lists before uploading them is the way to go. Follow the next steps to clean your contact lists status using ZeroBounce:
Clean your contact lists using zerobounce
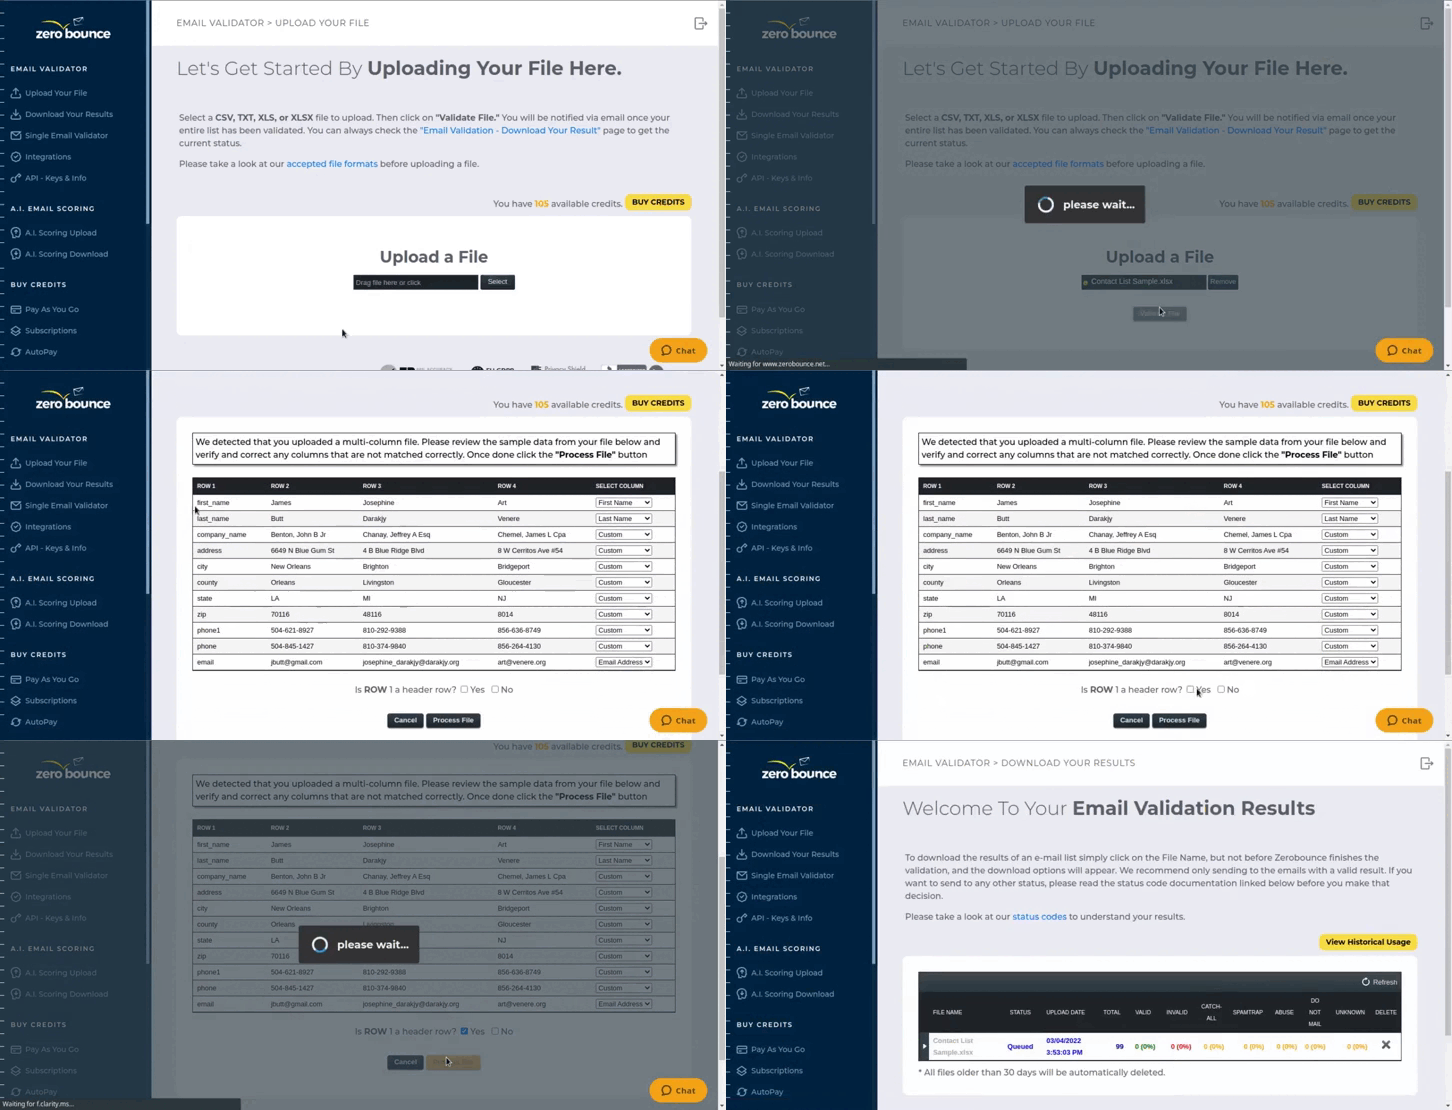
1.- First create an account at ZeroBounce. If your contact list has 100 contacts or less, it will be free for you. Otherwise, Zerobounce will charge a fixed price per email depending on your list length.
2.- Click on the “Upload Your File” option in the main menu.
3.- Drag and drop your file or click to upload it.
4.-If your file has multiple fields, map them accordingly to the default fields. If the field doesn’t appear, select “Custom”.
5.- Make sure the email field is mapped correctly.
6.- Click “Validate”. ZeroBounce will start checking your list.
7.- Depending on the length of your list, the process might take some minutes.
8.- Check the status of the analysis by clicking on the refresh button. Once your list has been validated, click on it to view the download options.
9-Select the append options that you wish to download. Click on “Download File” to download your file with your clean list.
10.- A .zip file will be downloaded. The file with your clean list will be inside.

Import your contacts from CSV file
Now, to upload your contacts on ActiveCampaign, follow the next steps:
1.- First, prepare your CSV file so ActiveCampaign can map the contacts properly.
2.- Once your file is ready, go to the main dashboard and click on the “Contacts” tab.
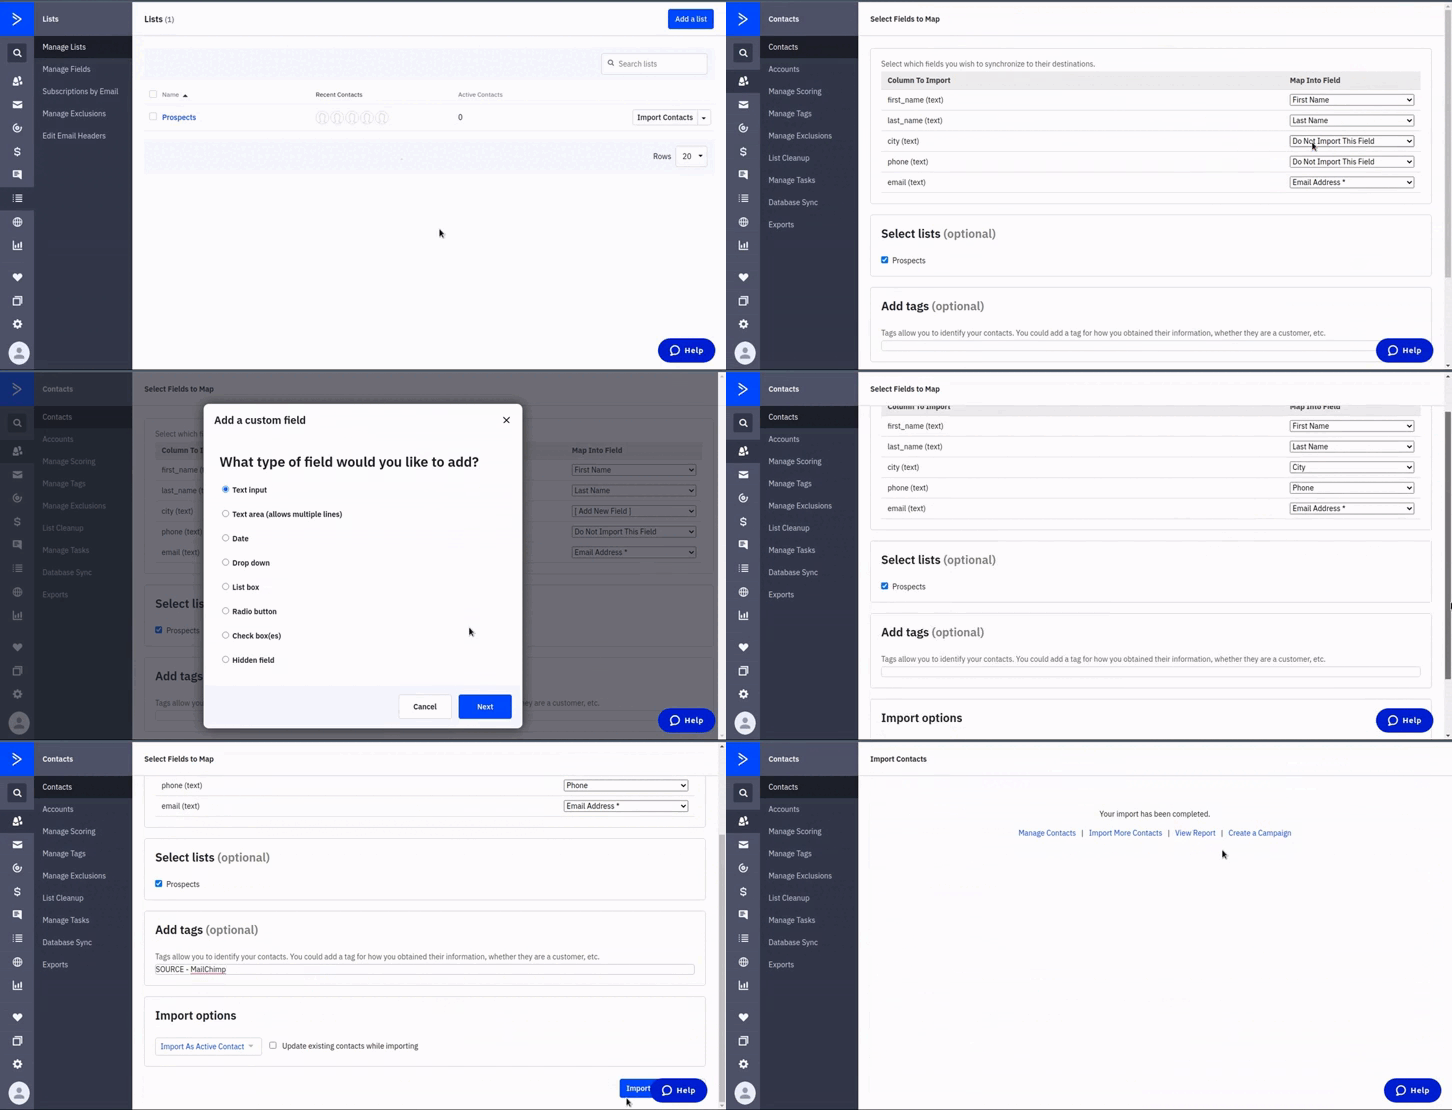
3.- Click on the “import” option at the top of your screen. You can also see the option on the list menu. The import option appears at the right of your list.
3.- It will redirect you to the import page. Note that it will give you different options for your importing. For this tutorial, we’re going to use the “Import From File” one.
4.- Choose the file where your contacts are stored.
5.- You’ll be redirected to the mapping screen. Just as you did on Zerobounce, map the fields accordingly to the fields of your file. You can add new fields if they don’t appear by default.
6.- Optionally, select the list where you want to place your contacts.
7.- You can add tags for all of your contacts.
8.- Click on “Import Now”. The contacts will start importing. The process may take some minutes.
9.- You’ll get a confirmation message when all the contacts have been imported.


Need some Help?
That’s how you properly import your contacts in ActiveCampaign. Remember to clean your lists before importing them, otherwise, your marketing campaigns are at risk of being marked as spam or not being delivered at all. At digitalME we can help you import your contact lists no matter their length. We can also validate them so you can be sure all of your email addresses are legit and active. Visit our AC page to see what our managed service includes, or click on the “Get in Touch” button so we can reach out to you and discuss your current needs, and give you a special quotation.
Contact us .
Please fill out this form and we will get back to you as soon as possible


 IN VALENCIA AND SAN DIEGO