
What is ActiveCampaign?
ActiveCampaign is a marketing and sales automation software company based in Chicago. The tool allows businesses and marketers to automate their workflows and email sendings and manage yous business CRM on the same dashboard. It’s one of the most popular software for email marketing, with more than 150,000 active clients. The tool is so popular because it is easy to use, has extended features (like connecting your website), its client support is outstanding, and it has hundreds of native integrations with other tools. This article will show you how you can integrate your ActiveCampaign account with DocuSign, so you can trigger automations on ActiveCampagn after signing your documents on DocuSign.

What is DocuSign?
DocuSign is an electronic agreements company based in San Francisco. The company was founded in 2003 and aimed to make life simpler for people and companies. The company was one of the first to develop and offer e-signatures to make digital agreements secure and easy to sign. The tool has a document manager where you can check the status of your contracts, send reminders of pending documents, and prepare files to make the signing process easy to follow. DocuSign meets the US and global standards for security and the protection of customer data making it highly secure and reliable.
What is a Digital Signature?
Digital Signatures are a reliable method for signing digital documents. They follow a standard PKI format that associates a user with the signed copy. The technology uses hash algorithms and encryption to ensure the document remains intact on both sides, so the sender and recipient sign the same file. Digital Signature is one of the securest methods for signing digital documents and is accepted in many countries, including the USA, Canada, Australia, and the European Union.

Why connect Docusign to ActiveCampaign?
It may be that your business is dependent on contracts or digital agreements to perform core operations. For example, if you’re a b2b, you may require your customers to sign a document before sending your products or providing them with your services. Sending documents can be part of your daily routine, and you would need to keep track of it. That’s when AciveCampaign comes in; it can simplify the process by performing automations after an action takes place on your DocuSign account, like sending an email reminder of the document that needs to be signed or tagging the contacts who haven’t signed yet.

How to connect DocuSign to ActiveCampaign
Currently, there are two ways you can connect your DocuSign account to ActiveCampaign: through Zapier and by Using Automate.io. Both solutions are free, and they allow you to use triggers and actions on both DocuSign and ActiveCampaign. However, ActiveCampaign only lists Zapier on their list of integrations. You can check what you can do with each one here:
This next tutorial will show you how to create a contact on ActiveCampaign when an envelope is sent from your DocuSign dashboard. You’ll need three accounts (one for each service): One on DocuSign, another on ActiveCampaign, and one on Zapier.
A Zapier example
Create a contact on ActiveCampaign after sending envelopes on Docusign
1.- This automation requires you to have at least an envelope sent from your DocuSign account. Once you have sent the envelope, you can start automating from Zapier.
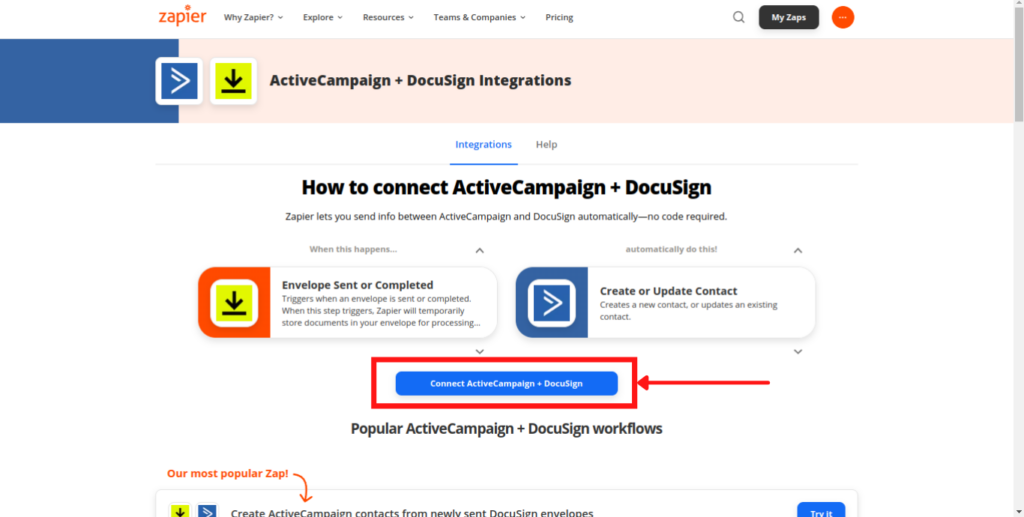
2.- Access this link to start the custom automation from Zapier. Click on “Connect ActiveCampaign + DocuSign”.
3.- Click on “Get Started” to start the connection.
4.- Access your DocuSign account
5.- Select the status of the envelopes that will create the contacts. Select “Sent” to retrieve all sent envelopes. Choose “Complete” to retrieve only the completed ones. We will use the “Sent” option for this tutorial so all sent envelopes will enter the automation.
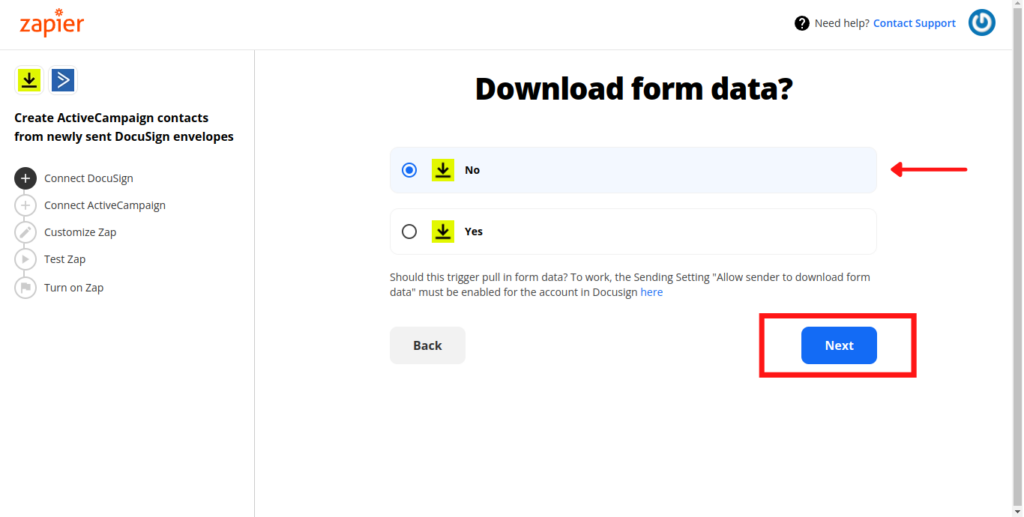
6.- You can trigger the automation to pull in form data by allowing “Download From Data”. You must have the option enabled in your Docusign account for this setting to work. For this tutorial, we haven’t enabled the function, so we will select “No”.
Note: if you enable download for data, and the option is not enabled on your DocuSign account, the automation might not work correctly-
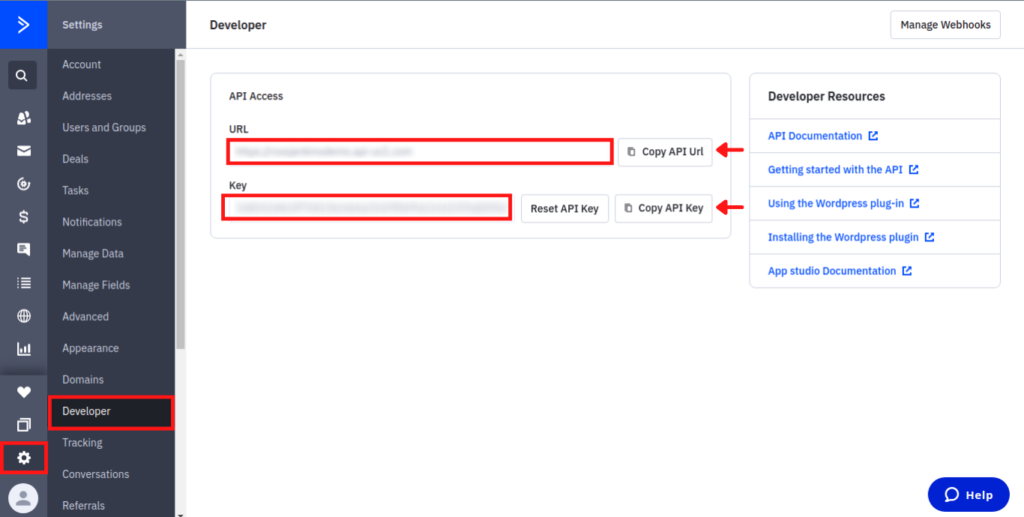
7.- Connect your ActiveCampaign account by entering your URL and API Keys. Go to your ActiveCampaign dashboard to access your credentials, click on the gear icon (Settings), and click on “Developer”. Copy and paste your credentials and click on “Next”.
8.- Select the list where ActiveCampaign should create the new user.
9.- Choose the fields you want to map from your ActiveCampaign account. It’s recommended to use the default ones.
10.- To verify the field mapping, Zapier will create a test contact on your ActiveCampaign account. Click “Send Test” to send the verification.
11.- Verify Zapier created the contact correctly on your ActiveCampaign dashboard. Make sure the fields were mapped adequately by comparing the fields on your DocuSign account.
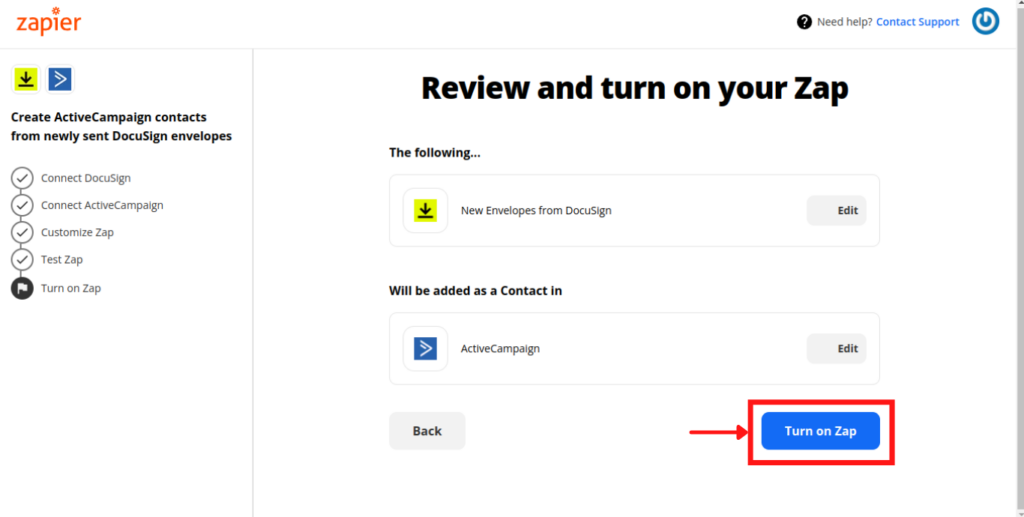
12.- Once you have verified the automation is working correctly, click on “Turn on Zap” to enable the automation.
13.- The automation now will be added to your Zapier account. You can create as many Zaps as your account permits.

Need more Help?
That’s how you connect DocuSign to ActiveCampaign. You can create different automations from Zapier depending on your business needs but make sure each automation is properly working before enabling it on Zap. Also, if you need help with your DocuSign integration, at DigitalME, we can help you, and also, we can give you advice on any matter related to your marketing strategies. If it interests you, you can click on the following button and complete the contact form, and we’ll get back to you as soon as possible.


 IN VALENCIA AND SAN DIEGO